Showing posts with label drawing. Show all posts

Thursday, October 28, 2010

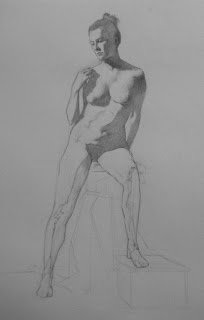
Tuesday Model Session: Study of Bilge, Session 4


Figure Study: Bilge Standing
Red/brown pencil and white chalk on buff toned paper
18 x 24 inches

Our lovely model Bilge gave us a standing pose to study for 4 sessions, and we greatly appreciate her for it! 

An update on the current painting and drawing classes I am offering - classes are filling very quickly so please email me ASAP if you want to be on the list for a future class:

10-Day Drawing and Painting Workshop
Jan 17-28, 2011
ONE spot left

Figure Drawing
6 Sundays beginning January 16, 2011
ONE spot left

Oil Painting I (Beginners)
6 Sundays beginning March 27, 2011

Oil Painting II  (Advanced)
6 Saturdays beginning March 26, 2011
Only 3 spots left

For more information about these classes and to register, please visit my Classes page

Also, I have updated my gallery page on my website so it is easier to see currently available paintings

Thursday, September 30, 2010

Tuesday Model Session: Study of Bilge, Session 1


This is the first 3-hour session of my drawing of Bilge. The lower drawing is my initial block-in stage, and the top drawing is the more refined stage of the same drawing. This will be a 4-session drawing. The original is about 18x24 inches.

Tuesday Model Session: Study of Terry


This is the final drawing and also the earlier block-in stage of my 4-session drawing of Terry. The drawing is done in General's charcoal pencil and General's "white charcoal" on toned paper. The original is about 16 x 20 inches.

Wednesday, September 01, 2010

"Black Jug" Session 2 & 3: Drawing & Transfer to Panel


8 x 10 inches
graphite on gessoed panel
work in progress


I completed my drawing on trace paper/mylar. I ended up drawing the spiney seashell on another piece of trace overlaying the drawing of the pot. Then I scribbled with a soft 4B pencil on the back of the paper, and transferred the drawing to panel by tracing over it with a hard pencil. I spent a lot of time lining up everything so the horizon line of the shelf is straight and the vertical access of the jug is truly plumb. Any error in this image is due to photo warping.

Thursday, August 26, 2010

"Black Jug" Session 1: Drawing

Study for "Black Jug" - work in progress
8 x 10 inches, graphite on mylar

The drawing for this painting is not complete, there is a second object in this composition I have not even begun to draw. But I wanted to post this because it's a good example of how I construct a symmetrical object. You can see I have drawn a center line, and how I have measured each significant point on the contour so I can plot each side symmetrically.

As I am working I often stand back to judge the progress of the drawing by asking myself 2 questions to check my proportions:
  • Is my drawing wider or taller than my subject?
  • Does my drawing have the same feeling and character as my subject?
I try to be as scrupulously honest as possible with my answers. I try to remain willing to change anything and everything to capture my subject more accurately. I never let "good enough" be a satisfactory answer. This is how I try to approach all my drawing and painting.

I found this gorgeous black jug in an antique/collectibles shop recently, and of course it reminded me instantly of a very famous painter of still lifes. So I will make no attempt to hide the fact that this piece is an homage to an artists who has inspired me a lot. Even though our approach and methods for painting are just about as far apart as is possible, the sense of calm, light, solidity, familiarity, and reverence he shows in his work has been a big influence on me.

I am also attempting something I rarely do, and that is to start two paintings at the same time - this one and the previous post, "Message in a Bottle". When I have tried this before, one painting gets neglected and languishes while I finish the other. I'm going to try to keep these going at the same pace and complete them at the same time. And I'll be documenting the whole process, so stay tuned.

--------------------------------------------------------------------
FIGURE DRAWING CLASS
I still have two more spots in my upcoming figure drawing class starting September 12.

Learn 19th century atelier methods for depicting accurate proportions, convincing light, and organic form through the careful study of a long pose.

6 Sundays, $480

Click here for more information and to register.

"Message in a Bottle" Session 1: Drawing


"Message in a Bottle" - work in progress
8 x 10 inches, graphite on mylar


It's always hard to start a new painting, and my FaceBook friends saw a few status updates from me this week about how hard it is to set up a still life. But I'm always relieved and excited when a still life finally comes together, even though it is rarely the vision I had when I started moving objects around on the shelf.

I still have a lot of antique scraps of paper from an era when I did a lot of collage, and a little piece of envelope, slightly yellowed, with a foreign stamp and a "por avion" printed on it seemed a perfect fit with the uniquely proportioned glass bottle. Another glass bottle wrapped in cream-colored tissue paper (not wax paper this time!) and a buttery-transparent little shell made friends, creating a harmony of creams.

In my last still life "The Wave" I really liked how the blue-white of the wax paper highlights made the shelf edge look slightly yellow in contrast. In this arrangement the cream colored papers and seashell make the shelf seem more white.

I think all my paintings are simply studies of all the different subtle hue variations within whites and grays.

Monday, August 16, 2010

Long Pose, Day 1 - "Danae"

"Danae"
pencil on panel
12 x 16 inches
Today was the first of a 5-day pose I have arranged in my studio this week. We have 5 artists participating (including me) and we work each day from 10am-5pm. For artists this is the ultimate working-stay-cation! Today we spent the first hour or so setting up a pose we all liked from many angles (no small feat!), and then chose our spots by lottery (I drew a #5, dead last, but I like my spot). The we all mounted our paper and got to work.

I'm attempting to do a very fast (fast for me!) painting of the our model Danae this week, so today I blocked in this line drawing on mylar paper and then during a model break I transferred the drawing to my 16x20 hand-primed panel. I spent the last part of the day refining the pencil drawing directly on the panel. Then I erased the extra graphite, brushed down the surface with a wide, flat brush to get rid of eraser crumbs, and coated it with thinned Damar varnish (thinned with about 1/5th mineral spirits) to preserve the drawing and seal the porous surface.

Tomorrow I start painting - record speed for me!

ALSO:


Live Webcast Studio Tour and Demo
Saturday August 21
9am -11am Pacific Standard Time
12noon- 2pm Eastern Standard Time
$10 - Click here to sign up


I'll be giving a video tour of my studio, a behind-the-scenes look at my latest Wax Paper painting "The Wave", and also doing a drawing demo. You can even submit your own questions, in advance or in real time.

Hope to see you there!

Thursday, August 12, 2010

Figure Drawing, Back Study


Back Study
14 x 16 inches
Graphite pencil, charcoal and chalk on toned paper

I did this drawing over two sessions at the Tuesday evening figure model sessions I host at my San Francisco Mission District studio. My recent Anatomy/Ecorche studies came into play as I tried to identify all the anatomical landmarks revealed by the raking light across her back.

I still have a few spaces left in my upcoming Figure Drawing Class, 6 Sundays starting September 12. For more details and to register visit my Teaching Page.

http://www.sadievaleri.com/teaching.html

Thursday, June 10, 2010

Tuesday Model Session: Study of Melissa


Study of Melissa
16 x 20, graphite on paper


Tuesday evenings I open my studio to long pose model sessions. I did this drawing of one long pose over 4 sessions.

The open model sessions are $80 for a series of 4 consecutive Tuesdays, $22 if you'd like to drop in and try one session before committing to a series of 4. The next series begins next Tuesday, June 15th. For more information and to sign up for upcoming sessions, visit my Class Schedule.


Thursday, May 20, 2010

Winged Victory Drawing Demo Recap


"Victory in Chalk"

Charcoal and white chalk on toned Ingres paper
16 x 20 inches

This is the sketch I did for my drawing demo at my San Francisco studio earlier this month. The evening was so much fun - I was very nervous the days leading up to it, and I wondered why I had planned such a high-stress event for myself right in the middle of my teaching semester... but once I got started talking and drawing it was a breeze!

We had about 28 guests in my studio, lots of snacks and wine, and during the breaks there was lots of mingling and a warm buzz of conversation.

I gave my condensed lecture on "Observing The Nature of Organic Form: Tapered, Spiraling, Interlocking, and Convex", which is my humble abbreviation of the amazing principles I learned from my master teacher Ted Seth Jacobs and also from his students Tim Stotz and Michelle Tully.

Thanks to everyone who came out, and extra special thanks to my mom, dad, sister and  husband who all helped me set up the studio and greet guests - I am so lucky to have a supportive family!

To be notified when I host a drawing demo again join my email list, or follow me on Facebook!

Tuesday, May 18, 2010

Odalisque Drawing


Mary as Odalisque
16 x 20 inches, charcoal and chalk on Ingres toned paper

I realized all the figure drawing I have done in the last year has been as demonstrations for my students, so it's been wonderful to get back to figure drawing just for myself! This was done at my weekly Tuesday evening model session at my studio. We have a great little group started, and there is still room for a couple more, hope you can join us! (see my teaching page for more info)

I am also offering these upcoming workshops:

early bird special: $600

early bird special: $600

Friday, April 23, 2010

Ecorche Drawings:Master Copies

Ecorche after Prud'hon, 8.5 x 11 inches

graphite pencil on mylar


One of the reasons I decided to take Andrew Ameral's anatomy/ecorche class is I hoped it would help me learn to draw from my imagination. The drawings here are my pencil copies from Prud'hon academies, but I drew the bones on trace paper overlay completely without reference.


Ecorche after Prud'hon, 8.5 x 11 inches

graphite pencil on mylar


Not that these bones are perfectly correct, but I could never do anything like that before.

I am almost done with my clay skeleton and this week as a class we will be moving on to the muscles. I'll be posting photos of my skeleton soon.

Thursday, April 15, 2010

"The Cabinet" Prep Drawing and Open Grisaille Underpainting

"The Cabinet"
12 x 16 inches, oil on panel, work in progress


It feels so good to be working on one of my still lifes again! This is the "Open Grisaille" underpainting - essentially just Raw Umber and turp, an initial pass at roughing in the basic values. I tell my students that at this stage you just have to accept some ugliness, it's impossible to make this thin, brushy layer look pristine.

Some artists do this stage as a "wipe-out", where they tone the whole panel and then wipe away the highlights. I don't do this because I find it wipes away my drawing too much, and lacks a certain level of precision. This layer is painted very thin, and I tell my students to think of "kissing" the contours with the tip of the brush, to avoid a hard, unthinking swipe along those carefully-drawn contours.


12 x 16 inches, graphite on panel, preparatory drawing


I started the drawing on Mylar drawing vellum (I like a brand called "Dura-Lar" - be careful not to buy the clear acetate in the similar packaging though). Then I transferred the blocked-in drawing to the panel before refining it. I always do the last few hours of refining the drawing directly on the panel, to avoid that dead "traced" look. That way every contour has been drawn from life right on the panel. I use the Mylar stage of the drawing for blocking in proportions and finalizing the composition.

The contour drawing is hard to photograph because the final lines are so thin and light, so I had to tweak the photo quite a bit in Photoshop, which is why it looks somewhat "dirty".

Once the drawing is finished I seal the panel with a coat of Dammar with some turp mixed in. This protects the drawing from being wiped away, and also makes the panel less "thirsty". Now it's a perfect surface to paint on.

-----------------------
Teaching schedule:
I'm always adding new classes, open model sessions, workshops and demos to my Teaching Page!

Tuesday, April 13, 2010

"From the Cabinet"


Here's a sneak peek at my new still-life setup - I am so excited to be starting a new painting again! Sometimes I agonize over setting up a composition but this one fell together easily, probably because I have fun new props to play with, courtesy of Susan Foster who generously let me take my pick from her fabulous collection of still life items. And I finally got to incorporate my treasured quail feather, which I have been meaning to paint for a while now. I am almost already regretting it already - those stripes are going to be a challenge!!

This is a new look for me - rich deep reds and soft greens, an antique aqua-colored ink bottle and some twisty dried twigs and fiddleheads... I think of it as a sampling from a 19th century "Cabinet of Curiosities".

The familiar item is my lovely little golden seashell. While blocking in the composition and then all the natural forms I am reminded that EVERYTHING is based on the most ancient of symbols, the mysterious spiral!

Friday, March 12, 2010

Ecorche: Spine and 2 more Skulls

Skull Proportion Studies
8 1/2 x 11 inches, graphite on mylar

I drew these skulls from life but first I constructed them based on rules of proportion. Now I have a bunch of questions for my anatomy teacher Andy (www.andrewameralart.com), because they still don't look quite right. I think in the upper left study I somehow inadvertently moved the top of the zygomatic arch up too high. And the lower one has some unidentifiable problems!

It's strange working with skulls... playing with proportions, both the drawings and the clay model of the skull just look warped and non-human, but as I adjust them they suddenly they start to approach a look I call "skullish", meaning suddenly they start to look like skulls.

I think we all have a template for what a skull looks like. I have noticed that at a certain point, the skull "locks in" (or at least gets closer) to the idea of a skull.

Spine Studies
8 1/2 x 11 inches, graphite on mylar

These spine studies are after Richer. His anatomy diagrams at first looked cold and a bit boring to me, but the more I copy them, the more I am impressed by the enormous amount of very precise information he packs in: gracefully at that, and with highly economical linework.

I spent a couple hours just blocking in these spines, but I got overwhelmed to think of drawing every little spinous process. I think I'll just draw ONE vertebrae from several angles!

Thursday, March 11, 2010

Ecorche Drawings: Pelvis, Shoulder Girdle, Skull/Rib/Pel combo

Two views of the Pelvis
graphite on mylar, 8 1/2 x 11 inches

More studies for my Ecorche Anatomy class with Andrew Ameral. Two solid studio days of just drawing bones, what fun!

Side view of the Pelvis
graphite on mylar, 8 1/2 x 11 inches

I'm also continuing to refine my clay figure, but it's coming along very slowly! I have massed in my ribcage, pelvis and spine, but I won't bother to post photos till they are more developed. Will hopefully post some photos of a prettier skull this weekend.

Shoulder girdle studies
graphite on mylar, 8 1/2 x 11 inches


Studies of Skull, Ribcage, Pelvis relationships
graphite on mylar, 8 1/2 x 11 inches

Most these drawings are copies from anatomy books (sometimes composites from several), only the pelvis drawings are from life.

Wednesday, March 03, 2010

Study of Ward

Study of Ward
16 x 20 inches, graphite pencil on paper

This is the demonstration drawing I did during my most recent "6 Sundays" figure drawing class with 6 private students at my studio. The "moon" in the upper right corner is the remnants of my lecture on how light and shadow behave on a sphere.

We all had a wonderful time studying the figure in a long, multi-week pose under cool north light.

I am offering my next Classical Long Pose Figure Drawing class at my studio in San Francisco beginning May 16th, 2010. Please visit my Classes and Workshops page for more information.

I am also planning to set up a long pose model share, full time for 2 weeks, probably in July. If you would be interested please email me to let me know: sadiej@gmail.com. This will be an uninstructed workshop, limited to a small group, with the option to draw or paint. More information coming soon!

Also, I leave tomorrow to fly to Florida for my opening at M Gallery in Sarasota, where I will be showing 6 paintings.

Thursday, February 18, 2010

Ecorche - Skull and ribcage drawings

Here are this week's anatomy drawings to prepare for my ecorche class on Saturday.

All of these are on 8.5 x 11 inch, graphite pencil on mylar. Oh, since I was asked in an email, this is the mylar I use. Be careful and read the label before you buy it at the store, though - it's really easy to buy the wrong stuff, the clear acetate pad looks almost exactly the same. (And it does not come in 8.5x11, Andy requested we do our assignments in this format so I cut down sheets from a larger pad).

Figuring out how to do the correct spacing on the ribs was the challenge. I did not realize how hard it was going to be. I can;t imagine sculpting this.... I guess I'm about to find out!

I really like the stage of drawing where I get to play around with tiny subforms and see all the crazy shapes nature can perform. But with the ribcage, it was all just blocking-in and measuring, no time to explore the fun details of the morphology.

I have a feeling there will be more ribcage drawings assigned next week though, so maybe I'll get my chance.

Sooo tired, but having a lot of fun!


Friday, February 12, 2010

Écorché - Skull drawings


Last week was the first day of my ecorche class with Andrew Ameral.

Ecorche is studying anatomy by sculpting a "flayed" figure - as if it has no skin, so you can see the bones and muscles. We sculpt the bones first and then build all the muscles over the skeleton.


Every week we will have drawing homework. This week we were assigned to draw a skull from 5 different views. It took me exactly 10 hours to draw these 5 skulls - very, very difficult to get the proportions correct.

These two sheets of drawings are each are 8x10 inches, drawn with graphite on mylar paper. Mylar is a translucent vellum that is my new favorite paper for pencil drawing. It grabs the graphite with a silky/dusty feeling and is capable of getting a huge range of value from graphite. These drawings were all done with 2H (very hard) pencils.

I also need to label these with all the names of the bones of the skull - did you know the skull is made up of 22 different bones?

I bought my skulls at The Bone Room. The store is near me in Berkeley, CA, but you can also buy from them online. The cast skulls with the brand name "Bone Clone" are amazingly high quality for a very reasonable price!! I bought the two skulls (one real, one cast), a whole pelvis, and also a fibula (which nicely illustrates the tapered, spiraling nature of organic form!). I contemplated lots of other things to buy, but had to hold off for now. Next I am going to save up for a whole skeleton....

Andrew's class runs through June, and I'll be blogging it as much as possible, so stay tuned!

Tuesday, January 12, 2010

First drawing class in the new studio

I just held my first class in my new studio, a weekend figure drawing workshop. The class was a wonderful group, and we all had so much fun!

There is still space for ONE more student in my 5-week figure drawing class beginning this Sunday, an opportunity to study a long pose in my new north-light studio.

Also, I just posted registration information for my upcoming classes: "Still Life Painting" and "Drawing for Absolute Beginners".

More information at:
www.sadievaleri.com/teaching.html