Saturday, August 22, 2009

Exhibit - Corot in California


My husband and I drove down to Santa Barbara for the weekend to see the current exhibit at the Santa Barbara Museum of Art on the French 19th century landscape painter, Jean-Baptiste-Camille Corot.

Park of M. Wallet at Voincinlieau 1866

The exhibit was two small rooms, only about a dozen works, but it showed a good variety from early and late periods in Corot's career, both sketches and highly finished works. It was exactly what I came to see, because I wanted to get a close look at how the paint is layered.

The styles of his early and late work are distinct - flat planes of brightly lit daytime scenes earlier on in his career, to his signature style of dark, silvery blurred forest scenes he came to be famous for. But the basic technique seems to be fairly consistent throughout.

"Large Sharecropping Farm" - 1865
(this painting was not in the exhibit, just similar to the one below I looked at)

The biggest disappointment of the exhibit was that photography was strictly prohibited and there was no catalogue or even a postcard published for the exhibit. The images here are ones I found online.

I took a lot of notes:
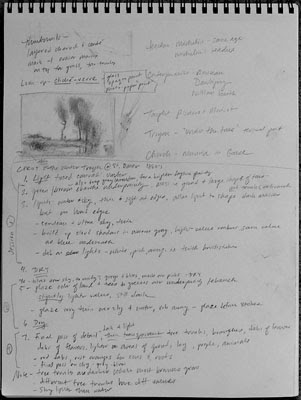

This is my thumbnail sketch of a painting called "The Water Trough at St. Omer" from the 1860's, but unfortunately I can't find a photo of it online. Most my notes were based on this painting because although it's a finished work done in the studio, it had patches where the underpainting was visible in some areas.

These are my notes for how I believe Corot built a painting:

Stage 1: Block in main light and dark of composition
1. Start with middle-value toned canvas in warm umber, not too light nor too dark
(may have mapped out composition with a contour drawing using a small round brush, but those lines are not visible.)

2. Shadow values: Mass in thin, colored underpainting ebauche of the large dark masses, mainly greens and browns (brightly lit mid-day scenes seem to have a lavender-grey underpainting).
  • Underpainting darker value than middle-value canvas ground.
  • Ground plane and foliage of trees laid in with careful drawing, using small bristle brush.
  • NO tree trunks, branches, individual leaves, or details.
  • Allow to dry (thin paint probably dried quickly, within the first session).

3. Light values - Mass in light areas, eg water and sky: Thin paint, soft at edges.
  • Sky background: ultramarine at top, cobalt or cerulean next, down to white, painted in gradation down to horizon, pinks at horizon if a sunrise.
  • Use light areas to refine shapes of dark areas. Careful painting around architecture and other firm lines. Still, no hard edges, very small value differences to create edges.
4. Cloud shadows painted in exact same value as sky underneath, slightly warmer neutral hue than sky. No light clouds yet.

5. Allow to dry

Stage 2: Middle values and color
6. Add color: thin paint, glazes maybe, slightly lighter values to mass in lighter values of greens in trees, areas where light hits foliage. Allow ebauche underpainting to show through in shadows, esp ground plane.

7. Tree trunks and branches: indicate with thin, transparent paint, harder edges.

8. Sky: paint clouds by building up lights to whitest whites, use thicker brushstrokes.

9. Allow to dry

Stage 3: Details and finishing glazes
10. Paint transparent umbers and blues over sky to unify color variations, but use individual brushstrokes, not completely smooth. Glaze very thin umber over thick whites strokes, wipe away, to give volume to brushstrokes.

11. Final pass of details in both dark and light
  • Paint darkest accents, small areas of deep shadow in black
  • Thin, transparent tree trunks, very thin branches and dabs of leaves in transparent paint
  • Tree trunks are different values from each other, and different values from top to bottom. Some tree trunks have white added to bring forward, some are transparent and sky shows through, some are opaque.
  • Small dabs of leaves and flowers in green, yellow, brown, white, both lighter and darker than background
  • A couple tiny red dabs
  • Final pass of glaze on sky, neutral grey-blue to unify
Notes:
  • Sky is always lighter than reflecting water
  • Tree trunks are darkest where most branches cluster

View of Rome, Bridge and Castle of St Angelo w/ Cupola of St. Peter's 1826-28

1. Middle value canvas, warm hue
2. Shadows: Main masses blocked in with a wash of cool neutral (lavender?) shadow hue, careful contours
3 Lights: Sky, water blocked in, careful contours
4 Middle values laid over dry underpainting (e.g. light half of cupola laid over shadow)
5 Darkest accents
6 Lightest lights, small touches

Note: Area of highest contrast is focal point of composition: more refined detail, lights and darks laid down next to one another

This is all my best guess... if you know of how Corot worked, please tell me!

Friday, August 14, 2009

Blocking In (new wax paper series)

Wrapped Silver Goblet (in progress)
11 x 14 inches
graphite pencil on trace paper

I have a couple teaching opportunities coming up which I am very excited about: I'll be teaching drawing this fall semester to first-year MFA grad students at San Francisco's Academy of Art University, and there are plans in the works to possibly do a couple workshops next year (I'll keep you posted).

All of these opportunities are really exciting, and as I have been thinking about them I find I am "teaching" myself as I work all the time. Observing myself as I work helps me avoid problems deeper in the drawing. It's a sort of narration: At first it was non-verbal narration, simply paying attention to what I see and and comparing that to my drawing. But since I have begun teaching, that internal narration is becoming more and more verbal, as I imagine how I would teach as I draw.

I've been working the last couple days to begin a few new paintings of still life, and my first step is using straight-line block-in to establish the composition and forms.

Wrapped Bottle (in progress)
graphite pencil on trace paper
6 x 8 inches

Block-in for me is always the most stressful stage of a painting or drawing. Positioning the correct placement and shape on that blank space feels like plotting a course across the Atlantic.

I put the first few lines down and for a short while I feel like everything is going great, and then as I move into the next level of detail the errors begin to show up. And since the initial block-in is defining the whole shape with only a few lines, the errors are usually quite drastic and devastating to the design. Panic!

Beach Stone and Wax Paper (in progress)
graphite pencil on trace paper
5 x 5 inches

I tell my students that drawing well is essentially learning to control a sense of constant panic (I say that because I think a lot of us are quietly panicking in drawing class, and it helps the students know everyone else is feeling the same way, including me.)

But I try to use that panic to my advantage. The "Oh, no, it's all wrong!" feeling can plummet any draughtsman into despair and temptation to abandon the drawing (or crumple, scribble, or burn it).... But it's also a useful feeling. If we can react to the feeling with calm and acceptance, and simply take it as a reminder to stop and look, it becomes a useful tool.

My confidence in the block-in process has grown with my experience and now I know if something is wrong, if I keep my head calm and just look, I'll probably figure out the problem.

Not that I always do a perfect block-in by any means. And I certainly do not do my best block-ins when I am demonstrating in front of a group. But like any mental/emotional discipline, the more you practice, the easier it is to tap into problem-solving mode and focus, even in stressful situations.

Monday, August 10, 2009

Lines and Colors Feature

I've been following Charley Parker's blog Lines and Colors for years now and as I pore over every post it's always been my secret fantasy that maybe someday my work would be featured on his blog... and today is my day!

If you don't already know Lines and Colors, be sure to click over and be ready to expose yourself to a wonderful lineup of artists and art movements. Each post profiles a different painter or illustrator, historic or contemporary, and Charley always shares a unique twist of interest into the artist's working methods or story. He seems fueled by an endless curiosity, and reading his blog you'll find yourself caught up in his energy and enthusiasm, too.

Sunday, August 09, 2009

SHOW: Landscapes at STUDIO Gallery

A few of the landscape sketches I created this past month at the Hudson River Fellowship will be on display at STUDIO Gallery in San Francisco August 12 - September 6.

The opening is Sunday, August 16, 2pm-6pm.

STUDIO Gallery is on Polk St at Washington.

Thursday, August 06, 2009

Outdoor Art Materials

I was just reading the comments in James Gourney's nice writeup for the Fellowship and realized I learned a lot about materials for outdoor painting during the trip and I thought I'd share.

Outdoor easel setup
Just about everyone was using a paint box palette mounted to a photographer's tripod for their plein air setup. (Some people preferred a light metal easel to mount their canvas and then held their palette in their hand, but there's so much to do with the non-painting hand outdoors - like swat mosquitoes - that I prefer a mounted palette).

Guerrilla Pochade Box
I started out with my 9"x12" Guerrilla box which has served me well on previous neighborhood plein air sketching but I quickly found it is too heavy and boxy for anything beyond a 10-minute hike. Considering I was climbing steep slippery rock steps most days to my waterfall site, I was really wishing for a lighter option. The plus side of the Guerrilla box is that it is extremely functional and sturdy and has tons of room for storing things. And its very cute boxy proportions draw lots of compliments. Emily Lee had the even cuter 6"x8" version and she was really happy with it, but you can see she sometimes had to use a handheld palette because the paint-mixing area is tiny.

Alla Prima Pochade
Everyone oohed and aahed over this nifty, well-designed box when it was shipped to Fellow Dorain Iten. The components are held together with magnets and the nice wood and beautiful design is eyecatching. He really liked using it, especially for the magnet that holds your palette knife while you work. The full version has awesome drawers and there is a "light" option that has separate storage compartments that attach with magnets, but even the light option still seemed a bit heavy for me.

Open Box M
Our instructors all used the "M" and after deliberating quite a while this is the option I decided to upgrade to. It's very expensive, but they offer a less expensive "kit" that includes a shoulder bag instead of the outer wooden box. However, I've personally found it very annoying to hike with a shoulder bag flopping over my arm. A backpack is the way to go.

After spending quite a bit of time on the site I finally figured out you can buy the palette/panel holder separately from everything else. I decided to order that alone, at 9"x10" and $195, and if I really feel the need I'll buy the wet panel carrier box separately later. Those two options even separately are less expensive than the kit that includes the shoulder bag - and much less expensive than the whole set which includes a wooden outer box. In the meantime, I'll use these lightweight "cocoon" wet panel carriers.

UPDATE: Lines and Colors posted a complete and detailed review of all the pochade box options available, be sure to check it out before you invest in one! It seems that Charley Parker went with the Alla Prima Pochade, it certainly looks like an amazing box. I'll come back and post and update later about how I like working with the Open Box M.

UPDATE 2: HRF Fellow Peter Sakievich posted a photo and description of his Open Box M setup on his blog.

Julian Umbrella
We all were jealous of Nick Hiltner's huge white umbrella that shielded him from rain, sun, and even more importantly... curious passersby! Several of us ended up ordering them and having them delivered directly to our location in the Catskills. Nick warned us that every part of the umbrella breaks often, but there really are no other options for white artist umbrellas we could find, and he said the manufacturer is willing to replace broken parts. Sure thing, the clamp contact has popped off, the umbrella has detached from the clamp (both luckily fixable on the spot) and after a week 3 spines had detached from the nylon. I reinforced every spine connection with duct tape so mine is not so pretty any more. All that said, it is a fantastic umbrella - it kept me dry even during one epic 3.5 hour downpour painting session. The white material casts perfect, diffused lighting on my canvas under all light conditions. And the most important feature... only the most brave passersby dare peek under the huge umbrella.

Camp Chair
I started out with the tiniest, lightest, overpriced at $20, 3-legged camp stool from REI, and in about 30 minutes realized it is miserable to sit on and has a bad habit of tipping. I "upgraded" to a folding, armless camp chair for $13 at the local hardware store. But I and everyone else who bought that one found that the seat and/or back canvas tore from the supports after a couple weeks of all-day painting sessions. The most hardcore of our group were lugging around full camp chairs with armrests which seemed like overkill to me, till I saw how nicely their umbrellas clamped to the arms, and how their turp jars nestled in the mesh cup-holders! So I might be upgrading to a fancy camp chair.

Painting Panels
I have been using wooden Art Boards in my studio and Gessoboard panels outside for a couple years now, but recently I'm finding I prefer a fine grade oil primed linen surface for outdoor painting (indoors I'll still use smooth wood for the most detail). I tried these:

Art Board oil primed linen 9"x12": $17.89
I liked the silky fine surface of these panels, but I found the damp conditions I was painting in made the panels warp forwards slightly. They will be fine once framed, but the warping was annoying on a multi-day painting.

Utrecht Master's oil primed linen 9"x12": $9.99
This panel is ok quality for a cheap price, and it's probably perfect for single-session plein air artists who like texture and thick paint. However, for multi-session painting with thin paint and more detail, this canvas has way too much texture.

New Traditions oil primed linen with gaterfoam 9"x 12": $10.17
Our instructors were using New Traditions and although I have not used them yet (just ordered my first batch) I was sold on their texture, lightweight archival gaterfoam core, and non-warping properties. And the price is right! You can choose different support materials and different finishes, but the portrait grade lead oil primed linen was my choice.

Tripod
I borrowed Dorians' tripod briefly but I loved it and hope to buy my own. The grip to move the ball head in any direction was easy and smooth and the tripod was really sturdy and even a tiny bit lighter than mine. It's the Manfrotto 190XPROB and Horizontal Grip Action Ball Head. It's expensive though, I might be waiting quite a while before I upgrade to this. There are much cheaper and lightweight tripods, and as with all things plein air the choice is between something durable/heavyweight versus something lightweight/flimsy.

Tuesday, August 04, 2009

Grand Central's Hudson Blog Post

Jacob Collins' Grand Central Academy, which sponsors the Hudson River Fellowship, has posted drawings and paintings by this year's Fellows on their blog:
grandcentralacademy.blogspot.com

Also, James Gourney, author of the blog "Gourney Journey", visited the Fellowship for our last evening meeting and then wrote up a nice post about us:
gurneyjourney.blogspot.com

Sunday, August 02, 2009

Hudson Fellowship Final Post: SOLD

Sunset in the Catskills (SOLD)
9 x 12
oil on linen

Saturday, August 01, 2009

Hudson Fellowship Day 26


Tree Color Study
9 x 12 inches
oil on linen panel

What a day - up and out in the field by 7:30am, quick run home for a 30 minute break at midday, then back to the field till 4:30. At 7:30 we'll go out again for a final attempt at a sunset study. We're trying to cram in one last good long workday before we leave tomorrow. Best part is it's been warm and sunny all day, and the puffy cumulus clouds rolling by all afternoon are indicating a killer sunset to come.

The painting above is my continuation of the painting I started a couple days ago. Later I moved into the shadow of the same tree to do a close-up drawing of it's awesome tangle of branches coming off the trunk (below).


Last, I did this little sketch of Emily under her white umbrella as she painted in a field of purple wildflowers under billowing cumulus clouds.


Emily en Plein Air
oil on linen
6 x 8 inches

Next up, dinner and then a final attempt at a sunset sketch. I'm really not looking forward to the sunset session as I have officially run out of bug repellent...

I probably won't have time to post again for a few days, as I plan to jump in the car early tomorrow to start my 4-hour drive to Pennsylvania where I'm meeting up with my husband before we fly together back to San Francisco in a few days. Thanks to everyone for following along, it's been a really intense month and I've appreciated all of your well-wishes.