Showing posts with label materials. Show all posts

Wednesday, November 17, 2010

Plein Air Setup


Painting outdoors is inspiring, beautiful, centering, and so adrenaline-rushing as to be addictive!

However, it is also uncomfortable, frustrating, full of distractions, and when your umbrella topples your easel over in a breeze, exceptionally maddening.

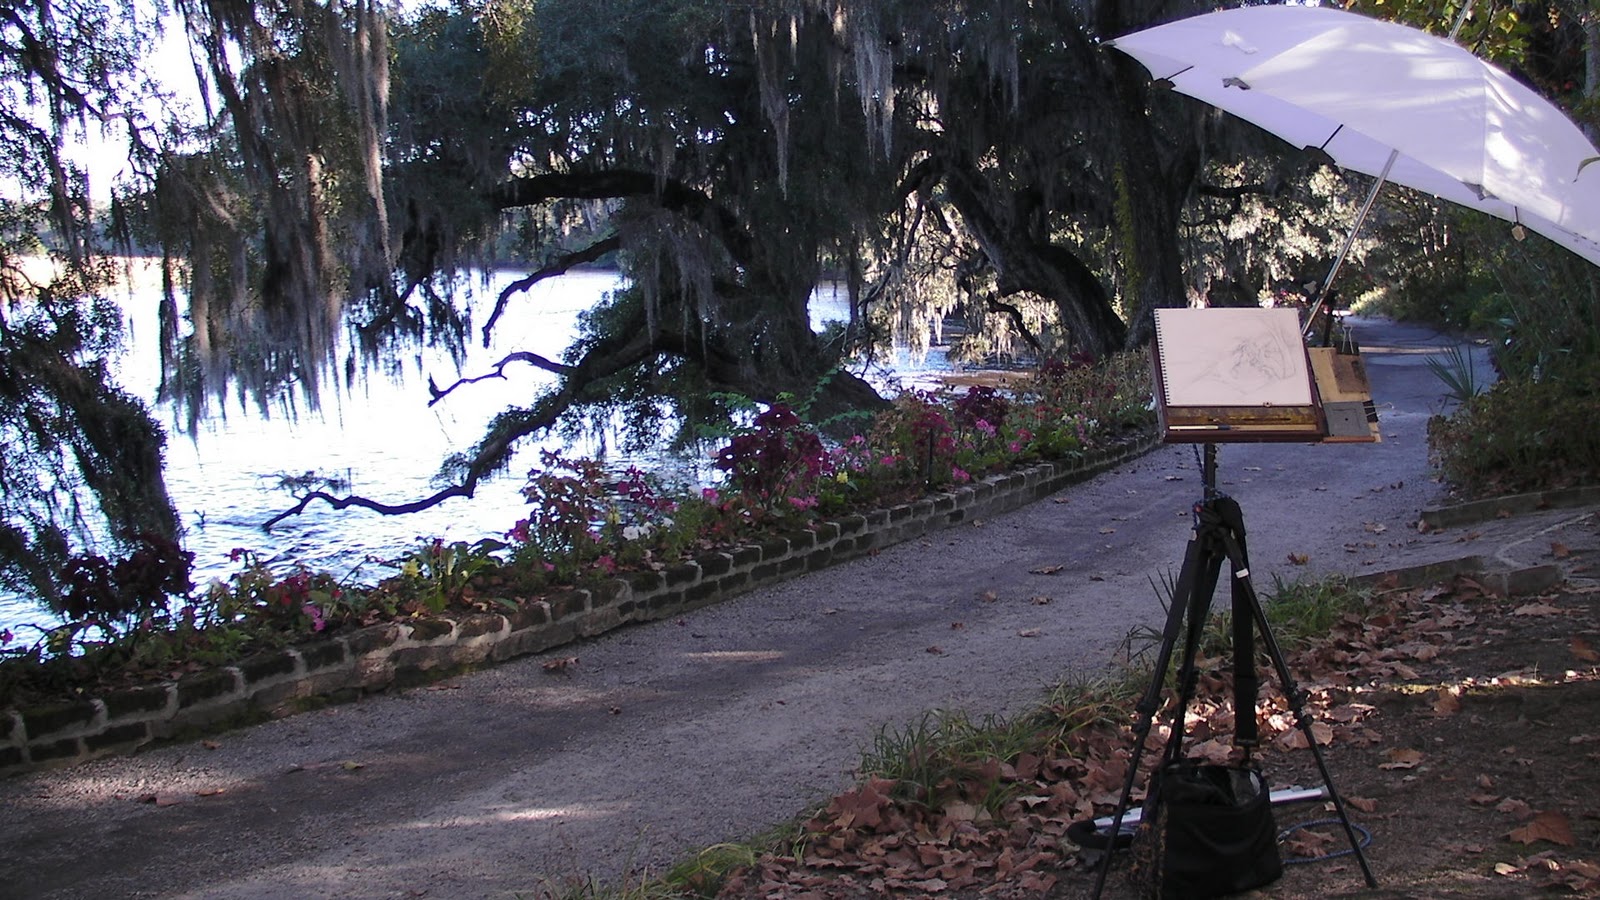
I have finally assembled a setup I find to be ideal - a good balance of lightweight, sturdy, and flexible:


This is how I pack it:
Instead of carrying around tubes of oil paint, I load up my Open M pallete with fresh nuggets of paint before I leave for the day. Sometimes I pack a small tube of white, if it's going to be a long day out.

I can fit my Open M pochade box, brushes, and solvent can in a backpack or shoulder bag, along with paper towels, lunch, etc.

The tripod, cane, Manfrotto arm, and umbrella I lash together with 2 short bungee cords. All those things combined are not very heavy, and I can carry it by the cane handle, or under my arm easily. For a long hike I might get a strap for it so I can carry it on my back.

Travelling with oil paints
I have traveled now many times with oil paint, and despite the horror stories we have all heard about having oil paints confiscated, I have never had a problem with this procedure:

Here is what I do:

  • Download and print a couple "material safety data sheets" (MSDS) which describe the contents of the paint - there's a different sheet for every color, but I just choose 2 or 3 and print those. Each manfacturer writes up and makes data sheets available online as PDF for all their colors, just google search one your paint brands and a color name with the phrase "material safety data sheets" and you'll find it.
    Here is a list of links to of many of the of MSDS paint brands
  • Print out a sign with big font that says:
    These are vegetable oil based artists materials.
    They are not flammable.
    Data sheets enclosed.
    DO NOT USE THE WORD "PAINT". The word paint is a big problem.
  • Fold the MSDS sheets and the sign together so the big message shows up on top.
  • Put all the tubes of oil paint in a gallon-sized heavy duty ziplock, and put in the folded packet of sheets so the sign is visible through the plastic bag. Make sure every tube is tightly-capped and there are not any holes in any of the tubes, the pressure changes during the flight will make a mess of any leaky tubes.
  • Place the bag near the top of your suitcase with the sign-side up so it's immediately accessible if security searches my bag. (I always get that little note saying they searched my bag, but my paint has never been confiscated.)
  • Check the bag. I wouldn't try to bring paints on board.
  • I also packed a tiny tin of the "natural turpenoid" (in the GREEN can) along with my painting supplies in my checked bag, to use as my medium. It says non-flammable very clearly right on the tin. I wouldn't use it as a medium in major paintings, but for sketches and all prima work while travelling it's probably fine.
  • I wouldn't bring any solvents, oils, mediums, or any kind of mysterious liquids in bottles. I usually buy those or borrow them when I arrive
  • Finally: Don't forget your palette knife! :)

Hope that helps! It would be terrible if the paints got confiscated and that's always a risk, so I can't guarantee it will be fine, but it's worked for me.

Friday, March 19, 2010

Home-Cooked Gesso Part II


My materials for making home-made gesso


I previously wrote a post about making my own gesso. This new post shares my notes based on my most recent batch: This week I prepped over 30 very small panels for my students.

The instructions below are based on the recipe and steps outlined on the Sinopia website, but I added all the tips and tricks I discovered along the way (my notes are in italics):

Ingredients:
  • Double Boiler, or 2 nested pots on a portable electric burner
  • Metal mixing bowl and wooden spoon
  • Rabbit Skin Glue (dry crystals)
  • Sinopia brand Titanium White pigment
  • Small power sander
  • Bag of marble dust. 
  • ArtBoard brand panels
  • housepainting brush
  • large tupperware container with lid

I bought everything at a hardware store and art supply store; the pots and bowls I stole from my own kitchen - not to be used for food again.


Preparing Glue Size (Rabbit Skin Glue) DAY ONE AND TWO
  • Soak one measure (by volume) of glue to 12 measures of cold water
  • I used 1/4 cup RSG to 3 cups water in a big tupperware container I do not plan to use for food again
  • Allow glue to soak preferably overnight
  • The next day it is a gelatenous substance.
  • Heat glue mixture in a double boiler bath - I don't have a double boiler, so I just nested two pots together which worked fine: I boiled a half-pot of water on a portable electric burner in my studio, and nested a smaller pot inside. The smaller pot is non-stick. The glue melts and becomes liquid very easily.
  • Apply glue while warm with a flat brush - I used a housepainting brush, but a softer art brush is probably better.
  • Be warned: this is makes sticky mess, since you need to cover the panel on all sides and there is nowhere to hold onto it. I discovered this method works best:
  • Hold the panel from underneath on your fingertips, like a waiter holding a tray, and then brush the glue onto the (top) painting surface and edges.
  • Lean the panel against a wall, so just the top edge or corner is touching, and them gently brush glue on the back side. (I scored and folded foamcore to protect my wall and floor)
  • Usually two layers are enough to seal the wood effectively. It dries fast, in about an hour or less I could do the second coat. Then I let the panels dry overnight.
  • At this point it is advisable to adhere a piece of fabric (thin muslin sheeting) to the panel to help stabilize the ground and to protect it from joints in the panel that might show in the gesso. (I did not do this - I like my painting surface to be very smooth and I didn't want the cloth texture.)
  • The left over glue-size then gets used for the chalk ground.
  • NOTE: The RSG turns to jelly again if you let it cool, it firms up quite a bit of you leave it to cool overnight, but you can re-heat the next day, it works fine.

Chalk Grounds: Ingredients DAY THREE, FOUR, FIVE....

3 parts of glue size (by volume) (I made extra RSG and used 3 cups)
1 part chalk (I used 1 cup)
1 part pigment (white, english red, umber, etc.)
I found it needs more pigment, otherwise the gesso is too watery and transparent. I ended up using more than 1.5 parts.
I used Titanium because I did not want to deal with the health hazards of sanding the lead-based "Flake" white

Chalk Grounds: Directions
  • Measure out the glue size solution into a metal container (I did not understand this at first - but it is to help measure correctly, since it is hard to know how much is left over in the double boiler once you have used it to coat the panels. I used a large metal mixing bowl.)
  • Add the dry ingredients
  • Stir well but do not whisk to prevent air-bubbles (I used a wooden spoon, worked great)
  • Place container in a double-boiler bath (see my nested pot solution above)
  • Apply warm mixture with a broad brush (I found it's better if the gesso is only slightly warms - when the water in the bottom pot is not full boiling, just simmering. The gesso is a bit thicker and covers more when it is only slightly warm, not hot.)
  • Allow layer to dry to the touch and recoat. (I found it did not dry fast enough to re-coat within a few hours. I ended up letting it dry overnight between each layer. I also sanded between before each subsequent coat with a small handheld power sander I bought for less than $40 - so worth it!!)
  • Note: When applying layers of ground, brushstrokes should be applied in one direction for every coat. Reapply subsequent layers in a perpendicular direction to the previous application. Yes this is true - otherwise deep grooves can develop which are hard to sand away.
  • I ended up doing 3 coats of gesso on most panels, and 4 on a few of them. It ended up being a week-long project, spending about an hour per day.
  • The gesso cools in the pot and gets quite firm overnight. I just left it in the double-boiler and re-heated the next day, it turned back into brushable paint very quickly and the texture was fine. Sometimes I added more pigment or RSG as it warmed, depending on whether it seemed too thick or too watery.
A note about my sander: I used a handheld Black and Decker sander, bought for less than $40. It had a micro-filter feature for reducing dust which worked quite well. I'm not a power-tool kind of person, but it was amazingly easy to use. Highly recommend!

Hope you find this useful! I know I'll be referring to these notes when I prep my next batch of panels, hopefully not for a good long time :)

Sunday, November 22, 2009

Surface Preparation

I spend the first 15-30 minutes per painting session preparing the surface of my painting-in-progress.

Like so many other aspects of this lifelong process of learning to paint, previously I could not imagine focusing on something so mundane and technical, but I find it saves me so much time and headache later that it's worth the investment. And now I actually enjoy the sort of easy, meditative process of cleaning and preparing my surface.

First, I only paint on a dry surface that has had at least 20 hours to set for underpainting medium, and 40 hours to set for slower-drying painting medium. Painting on a gummy or tacky surface just makes a mess. (The recipes I use for painting medium and underpainting medium are in my Materials post)

Next, I use a tiny folded piece of 12oo grit sandpaper to lightly rub the surface of the completely dry layer from the previous painting session. This loosens any lint or grit that dried into the previous layer, which can then be lifted off by lightly dabbing with a small piece of masking tape.

The abrasion also gives the dry layer more "tooth" so the wet paint sticks - otherwise the oil tends to bead up.

(Abrading makes the surface a bit cloudy, and the previous rich oily areas look chalky and ugly. It's ok though, the luster comes back easily.)

Once I have a lint-free, abraded surface I use a soft filbert brush to apply a thin layer of painting medium - but only to the area I plan to work on in this session. Even a thin layer can sometimes drip or run, so I use a clean, microfiber cloth to wipe away most the oil.

This oiled surface is called a "couch" - I'm not sure why except that painting on it feels like sinking into a comfortable couch, the paint flows off the brush so easily.

To start painting, I pre-mix my puddles of values and colors on my palette with my palette knife, and then re-wash my clean brushes in Natural Turpenoid, to get rid of any dust that may have settled overnight, and also to re-wet the bristles. Then I dry the brush on a clean cloth and dip it into my painting medium.

After all that, I'm ready to start painting!

Thursday, August 06, 2009

Outdoor Art Materials

I was just reading the comments in James Gourney's nice writeup for the Fellowship and realized I learned a lot about materials for outdoor painting during the trip and I thought I'd share.

Outdoor easel setup
Just about everyone was using a paint box palette mounted to a photographer's tripod for their plein air setup. (Some people preferred a light metal easel to mount their canvas and then held their palette in their hand, but there's so much to do with the non-painting hand outdoors - like swat mosquitoes - that I prefer a mounted palette).

Guerrilla Pochade Box
I started out with my 9"x12" Guerrilla box which has served me well on previous neighborhood plein air sketching but I quickly found it is too heavy and boxy for anything beyond a 10-minute hike. Considering I was climbing steep slippery rock steps most days to my waterfall site, I was really wishing for a lighter option. The plus side of the Guerrilla box is that it is extremely functional and sturdy and has tons of room for storing things. And its very cute boxy proportions draw lots of compliments. Emily Lee had the even cuter 6"x8" version and she was really happy with it, but you can see she sometimes had to use a handheld palette because the paint-mixing area is tiny.

Alla Prima Pochade
Everyone oohed and aahed over this nifty, well-designed box when it was shipped to Fellow Dorain Iten. The components are held together with magnets and the nice wood and beautiful design is eyecatching. He really liked using it, especially for the magnet that holds your palette knife while you work. The full version has awesome drawers and there is a "light" option that has separate storage compartments that attach with magnets, but even the light option still seemed a bit heavy for me.

Open Box M
Our instructors all used the "M" and after deliberating quite a while this is the option I decided to upgrade to. It's very expensive, but they offer a less expensive "kit" that includes a shoulder bag instead of the outer wooden box. However, I've personally found it very annoying to hike with a shoulder bag flopping over my arm. A backpack is the way to go.

After spending quite a bit of time on the site I finally figured out you can buy the palette/panel holder separately from everything else. I decided to order that alone, at 9"x10" and $195, and if I really feel the need I'll buy the wet panel carrier box separately later. Those two options even separately are less expensive than the kit that includes the shoulder bag - and much less expensive than the whole set which includes a wooden outer box. In the meantime, I'll use these lightweight "cocoon" wet panel carriers.

UPDATE: Lines and Colors posted a complete and detailed review of all the pochade box options available, be sure to check it out before you invest in one! It seems that Charley Parker went with the Alla Prima Pochade, it certainly looks like an amazing box. I'll come back and post and update later about how I like working with the Open Box M.

UPDATE 2: HRF Fellow Peter Sakievich posted a photo and description of his Open Box M setup on his blog.

Julian Umbrella
We all were jealous of Nick Hiltner's huge white umbrella that shielded him from rain, sun, and even more importantly... curious passersby! Several of us ended up ordering them and having them delivered directly to our location in the Catskills. Nick warned us that every part of the umbrella breaks often, but there really are no other options for white artist umbrellas we could find, and he said the manufacturer is willing to replace broken parts. Sure thing, the clamp contact has popped off, the umbrella has detached from the clamp (both luckily fixable on the spot) and after a week 3 spines had detached from the nylon. I reinforced every spine connection with duct tape so mine is not so pretty any more. All that said, it is a fantastic umbrella - it kept me dry even during one epic 3.5 hour downpour painting session. The white material casts perfect, diffused lighting on my canvas under all light conditions. And the most important feature... only the most brave passersby dare peek under the huge umbrella.

Camp Chair
I started out with the tiniest, lightest, overpriced at $20, 3-legged camp stool from REI, and in about 30 minutes realized it is miserable to sit on and has a bad habit of tipping. I "upgraded" to a folding, armless camp chair for $13 at the local hardware store. But I and everyone else who bought that one found that the seat and/or back canvas tore from the supports after a couple weeks of all-day painting sessions. The most hardcore of our group were lugging around full camp chairs with armrests which seemed like overkill to me, till I saw how nicely their umbrellas clamped to the arms, and how their turp jars nestled in the mesh cup-holders! So I might be upgrading to a fancy camp chair.

Painting Panels
I have been using wooden Art Boards in my studio and Gessoboard panels outside for a couple years now, but recently I'm finding I prefer a fine grade oil primed linen surface for outdoor painting (indoors I'll still use smooth wood for the most detail). I tried these:

Art Board oil primed linen 9"x12": $17.89
I liked the silky fine surface of these panels, but I found the damp conditions I was painting in made the panels warp forwards slightly. They will be fine once framed, but the warping was annoying on a multi-day painting.

Utrecht Master's oil primed linen 9"x12": $9.99
This panel is ok quality for a cheap price, and it's probably perfect for single-session plein air artists who like texture and thick paint. However, for multi-session painting with thin paint and more detail, this canvas has way too much texture.

New Traditions oil primed linen with gaterfoam 9"x 12": $10.17
Our instructors were using New Traditions and although I have not used them yet (just ordered my first batch) I was sold on their texture, lightweight archival gaterfoam core, and non-warping properties. And the price is right! You can choose different support materials and different finishes, but the portrait grade lead oil primed linen was my choice.

Tripod
I borrowed Dorians' tripod briefly but I loved it and hope to buy my own. The grip to move the ball head in any direction was easy and smooth and the tripod was really sturdy and even a tiny bit lighter than mine. It's the Manfrotto 190XPROB and Horizontal Grip Action Ball Head. It's expensive though, I might be waiting quite a while before I upgrade to this. There are much cheaper and lightweight tripods, and as with all things plein air the choice is between something durable/heavyweight versus something lightweight/flimsy.

Friday, June 05, 2009

Dust and Lint Solution: Wet Sanding

NOTE: This started as a brief addition at the bottom of the previous post, but then I ended up describing more details in an email to someone... then realized it's worth devoting a whole new post to wet sanding.

The issue is dust and lint that falls onto the painting or is deposited by linty brushes or rags. It doesn't seem so bad when the paint is wet, but the surface of the dry painting seems to show the impurities more as the paint film dries. 

I usually spend time at the beginning of a painting session blotting up any stray lint on the previous dry layers with a piece of semi-sticky tape, and then again at the end of the day using a tweezer in the still-wet layer, but I still end up with lots of debris. It might not matter for some painting styles, but for detailed glazing on a smooth panel it can be a big problem.

So I got a tip to try wet sanding and it worked really well for me. Here's what I did:

Materials:
  • 1200-1500 grit wet/dry sandpaper
  • linseed or other painting medium oil
  • small bowl for the oil
  • clean, lint-free rag of synthetic material - a microfiber eyeglasses cleaning cloth works great! (cotton rags and paper towels have too much lint)

I used 1500-grit "wet/dry" sandpaper, moistened with a bit of linseed oil. I rubbed any area of the surface that was imperfect: too much medium, or a piece of embedded fiber or dust. It worked really well, I was amazed how the imperfections were healed by the process - most debris lifted right out and left the colors of the painting intact. Small unintentional drips or ridges sanded right off easily. I had to do a bit of touch-up painting in a few areas, but the process was a huge success.

I did the wetsanding on fairly-dry areas - maybe a week of drying. Dry to the touch, but you could probably still gouge or dent the surface if you tried. I was also willing to repaint whatever I messed up. (I wouldn't try it for the very first time on a masterpiece you thought was done and no longer have reference for, in case a little repainting is necessary.)

I was actually surprised how much I could rub and disturb the surface, and still the colors of the paint would remain. In some places the surface fogged up a tiny bit but was pretty resilient. I did leave a very thin layer of oil to restore the gloss in some areas (although I know some people say not to do that and just wait till varnishing.)

Also, it's not sanding like you sand a piece of furniture - I used a tiny folded square of sandpaper bent over one fingertip and pressed very VERY gently and rubbed in a very small area, only in areas that needed it.

Once I sanded I had a yucky layer of wet oil and loose lint, so I needed to find a lint-free way to wipe that off. I found what worked best was a microfiber eyeglass-cleaning cloth I bought at the local hardware store. I could wipe firmly enough to wipe off the wet oil and dust, without leaving additional lint dust like a paper towel or cotton rag would have. 

Of course, a linseed-oil soaked rag is not good to leave around (serious fire hazard), so I washed it in natural turp and then soap and water at the end of the day... so it adds some steps to my normal cleanup.

One more tip: An accomplished painter I know just recommended using "shop cloths" as studio rags. They are extra heavy duty blue paper towels on a roll, I found them in the hardware store. They are amazingly lint-free. I had previously been using well-washed flour-sack dishcloths, and they seemed pretty lint-free but I now suspect they were adding to my dust problems - I seem to have a lot of very tiny white filaments flying around my studio. I'm going to try the shop cloth for a while for wiping brushes while I paint and see if that helps reduce the dust in the first place. (But I still would only use the microfiber eyeglass-cleaning cloth to actually wipe the surface of the painting.)

Let me know if you have any additional tips for cleaning the surface of your painting or dealing with dust in the studio.

Monday, March 30, 2009

My materials - paint, mediums, gesso, brushes


I've been getting some questions about what materials I use, so I thought I'd write a post about it so all my answers are in one place.

Brushes
I love love love Robert Simmons brushes. They are amazingly good quality and amazingly cheap. They are so cheap that when a brush loses it's springiness or it frays, I just toss it and grab a new brush. I use the 785 series white sable round, mostly sizes 4, 1, and 8/0. I also make my own smaller brush with an x-acto knife, by trimming off half the hairs of an 8/0 size brush.

Paints
Use good quality brands. Cheap oil paints are just less pigment and more oil, so you use more anyway. A tube of cheap paint actually feels lighter in the hand than the same color tube of a higher quality paint! I like Sennelier brand. I've never used Old Holland but I've heard those are the best and plan to try them out as I need to replace my tubes. I was taught by Kirstine Reiner to grind my own paints, which is really the best way to paint, and not as difficult as it might seem. I'm starting to be annoyed by the "graniness" of prepackaged paints, so maybe I'll get around to mixing my own again someday.

Palette
I use a small brown wooden handheld palette. I've tried white palettes, glass palettes, and huge oversized wooden handheld palettes, but I always go back to the little brown one. And I often clamp it to the easel just below my painting so I don't have to hold it.

Mediums
I mix my mediums in a clear, straight-edged jar, and I make a few evenly spaced marks up the side with a small sharpie for measuring by "parts".

Underpainting medium (for thin, transparent layers)
2 parts linseed oil
1 part turp

Painting medium (for heavier oil, later layers)
1 part linseed oil
1 part stand oil

Panels
Art Board

Gesso
I mix my own, but it's a big project, so for smaller/faster paintings I use a Art Board brand gesso.

Brush cleaner
Turpenoid Natural in the green can is great for cleaning brushes, I swish my brushes in it to clean them in a "Silicoil" jar. I like that it leaves the bristles pliable and conditioned and never dries them. I don't use Turpenoid Natural in my paints or mediums though, it seems to dry sticky and I'd be afraid of what that would do to a finished painting over time.

Thursday, October 23, 2008

Home-Cooked Gesso

The messy studio - a far cry from the "gallery look" of last weekend!

I've finally decided it's time to bite the bullet and become a painter who preps my own supports.

"Support" is the general term for what an oil painting is painted onto, either a wooden panel or stretched canvas. I prefer wood panels to stretched canvas because the surface is smoother and more rigid.

Previously I have mainly used factory-gessoed wood panels, like GessoBoard. Gesso is the chalky white paint that is layered on a canvas or wood panel before you start an oil painting. But I've decided that if I'm going to spend 60 hours on a painting, I may as well spend a couple hours preparing the surface.

So being an all-or-nothing type, I dove in and spent 3 solid days layering 19 panels with 2 layers of rabbit skin glue and 5-6 coats of homemade gesso, sanding between each layer. My right deltoid muscle aches to say the least.

I used traditional gesso materials from Sinopia (glue crystals, chalk, and white pigment) and combined them using their traditional gesso recipe. For the wood panels I used ArtBoards of all sizes, rectangles and squares from 6 x 6 inches up to 18 x 24 inches.

I bought a single burner hotplate for using in my studio, and improvised a double boiler by nesting two old cooking pots together - two pots that won't ever be used for food again.

First I soaked the rabbit skin glue crystals in water overnight, which made a transparent, gelatenous gray lumpy mixture. Then I put the mixture into my double boiler, and when it warmed up it got clearer, runnier, and became a thin, watery glue. It spread really easily onto my wood panels with a housepainting brush, but immediately began to sink in to the wood and dried almost instantly.

Re-reading the directions, I found out I had to do TWO coats of the glue. It wasn't too horrible, and I have a good ventilation system in my studio, but there was definitely a distinctly funky odor. I don't know exactly how they make rabbit skin glue, but I imagine vegetarian painters don't use it.

Once the panels were sealed with the glue, I mixed together the chalk, white pigment, and remaining glue mixture and warmed it to make the gesso. It made a watery, not very paint-like liquid, so I had to play around with the proportions a bit. But I found it works best if it's slightly more watery than housepaint, so you can paint thin layers.

This was how I stacked them to dry, "good side" leaning down to avoid dust, but careful not to let the front surface touch anything. I got pretty good at perfecting a sort stable mutual leaning system. Every time I added a layer of gesso to a panel, I had to lean it up to dry, and by the time the last was painted the first was ready to be sanded, so I had to rotate them around quite a bit.

The sanding was the most tedious part, and my arm began to really ache. The second and third day I tried to use my left hand as much as my right to sand, so now both my arm ache.

Anyway, the project was a success - I now have 19 beautiful panels with a silky/chalky/smooth surface, plus a dozen teeny tiny panels that were just laying around the studio, for little oil sketches. Hopefully I won't have to do this again for a long time!