Friday, August 29, 2008
Thursday, August 28, 2008
New Website Launched
Wax Paper and Ribbon: FINAL (SOLD)

This painting will be showing at San Francisco's ArtSpan Open Studios Exhibition beginning with the Private Preview Gala October 4th. Each participating artist submits one piece to include in the show, so it should be a pretty eclectic event.
I will also be opening my studio to the public as part of ArtSpan's Open Studios for the weekend of October 11 & 12. More details coming soon.
Friday, August 22, 2008
Wax Paper and Ribbon: Session 10
 session 10 (detail)
I worked most the day on the wax paper, but after nearly 3 days staring at the same texture my mind just about revolted, so I switched in the late afternoon to working on the pedestal bowl. It's silver but it's all tarnished and it was SO much fun to paint. I barely had to fiddle, just cranked out the whole layer in one pass. I'll probably deepen it later with some glazing when it's dry, but it's fairly done I think.
I really like the feel of working on a layer of transparent medium - I coat it all over the area I'm going to work in, and then the strokes go on silky but just a tiny bit of grab, especially if it's had a few hours to set. I just use a simple medium of 1 part stand oil and 2 parts linseed oil.
Wax Paper and Ribbon: Session 9
 session 9 (detail)
click image for larger version

I spent all day working mainly on the wax paper. I found myself making very different brush strokes than usual. I haven't been paying much attention to brush strokes the last few months because I decided that worrying about my marks was making me pay more attention to my painting than to the subject. So I decided to abandon ideas about mark-making and just pay attention to the subject exclusively.
But here they are, creeping back in. I'm actually excited about it, because I feel like I am making the marks in response to the form I see, and not in response to an "inner eye" idea of what a mark should look like. These marks have a light, feathery touch and flick up at the tail. But it's totally different from how I painted the ribbons, unfortunately.
It will be interesting to see how (and if) this painting comes together.
Tuesday, August 19, 2008
Wax Paper and Ribbon: Session 8
 oil on panel
12 x 12
work in progress
I worked on refining the ribbons more, and another pass on the right half of the wax paper but still fairly general values, nothing specific. I also did a layer to darken down the background, and applied a layer of transparent glaze overall.
I've been having trouble with the under layers "lifting off", and I think it's because the medium I was using contained turpentine/thinner. I switched to a medium of just linseed and stand, no turp at all, and I'm hoping this starts sealing down each layer so I'm not struggling so much with applying the paint.
I'm still filming, but I'll probably just post a nice big movie of the whole process at the end.
Monday, August 18, 2008
Wax Paper and Ribbon: Session 7
 session 7 (detail)
Tuesday, August 12, 2008
Wax Paper and Ribbon: Session 6
 12 x 12 inches, oil on panel
in progress: "ebauche" underpainting
See the previous post for this painting
I had a studio drama today. I tried to make a tiny adjustment to the wax paper in the setup, and accidentally knocked an entire loop of ribbon off of the silver platter. The loop then flopped over the rest of the ribbon pile, pretty much distorting every inch of the curls. AACK.
I held my breath and spent several tense minutes nursing all the loops back into their respective positions. For several horrible moments I didn't think I'd be able to salvage it, and imagined all the work involved to re-draw and repaint it - I've already invested 20 hours of work onto this little 12 x 12 scrap of board. But thanks goodness, the satin fabric had some "memory" of the curls they have been sitting in for a week now and eventually they settled back into a fairly close semblance of their original position.
Anyway, it sounds small but I was pretty shaken imagining 5 days of work nearly negated, and had to stop painting and watch an hour of TLC "What Not to Wear" to recuperate. Drama drama.
Once calm I resumed painting and managed to finish the second layer of underpainting. I even remembered what it's called, this opaque underpainting: "ebauche". I guess that's what I am doing.
I'm excited to have such a developed foundation to start the "real" painting on. With the earlier stages of contour drawing and underpainting there is no magical illusion, just preparation - all the work but little satisfaction. It will be fun to paint on this surface where I have already taken a stab at the drawing, value and color decisions.
Now the painting needs to dry before I can continue, which is good timing as I have a friend arriving from the East Coast tonight to visit and won't have time to paint for a few days.
I am continuing to film the time-lapse, but editing it and posting it take a lot of extra time so I won't be posting the videos very often.
Finally, thanks to those who have written me such encouraging emails and comments. I consider this my own personal art journal but it's always really nice to know other people are enjoying following along, and I think all artists need as much encouragement as we can get. So thank you, it means a lot to me.
Monday, August 11, 2008
Wax Paper and Ribbon: Session 5
 12 x 12, oil on panel
After completing the umber underpainting yesterday I started the opaque layer.... at least I thought I did. I am trying to keep the paint fairly thin and under control, and also within a slightly reduced value range (I'm not going up to the lightest lights yet) so even though I am using color plus white and the paint is more opaque, it's functioning more like an underpainting.
I find myself thinking several steps ahead: not painting what I want the final painting to look like, but thinking what the next layer of paint will look like on top of what I am currently painting. But I feel like I'm in deep water, I guess because I am sort of teaching myself at the moment.
By the way, a fellow artist blogger who is re-teaching himself to paint and draw using traditional techniques has recently come back online after a break from blogging with some astonishing work. I think you'll enjoy seeing what he's up to, here is his site: Learning to See
Sunday, August 10, 2008
Wax Paper and Ribbon: Sessions 3 and 4
 underpainting (sessions 3 and 4)
 My goal was to really work to get the large major areas of value correct in relationship to each other, so when I start with opaque paint at a more detailed level I'll know I am working within the correct general range of value as it relates to the whole painting.
I'm trying to keep the edges soft, because putting in a hard line can make problems later on if I want to correct something. I'm also keeping the paint very thin and in control. Any two values next to each other are kept very close at this stage, no big jumps. I've found that forging ahead to carve out the lightest lights is satisfying and gets instant "popping" results, but can make problems for me later. Therefore, the whole thing looks a bit dingy at the moment.
Sorry no video demo today - I've filmed it, but we're having technical difficulties.
Friday, August 08, 2008
Wax Paper and Ribbon: Session 2
 preliminary drawing (session 2)
graphite on panel
Yeah I know, this one looks nearly identical to the previous version. It's hard to believe I put another several hours into it. But there are always drawing errors that dog me throughout the painting, so this time I'm trying to resolve the drawing issues as much as I possibly can.
Thursday, August 07, 2008
Wax Paper and Ribbon: Session 1
 Wax Paper and Ribbon
graphite on panel
I've started a new painting, this is the drawing I've done directly on the prepared wood panel.
I've been taught to do the drawing on paper first, but I've found that when I transfer (trace) my contour drawing to the panel, too much is lost. My linework is degraded so much that I have to spend a lot of time correcting on the panel anyway. So now I draw directly on the panel from start to finish.
The drawing lessons I learned from Juliette Aristides, Ted Seth Jacobs, and Tim Stotz are what I think about most while I draw.
First I rely on the block-in method as taught to me by Juliette. I use long, straight lines to find the major "tilts" of the contours - I try to make just 4-5 lines at first to summarize the entire composition, being as accurate I can with the overall tilts.
Then I break down these straight lines into smaller segments, and compare the drawing constantly to what I see in life, until I have a straight-line block-in that I feel captures the overall proportions and feeling of the composition. The block-in has to have the strength and harmony I see in life... if it doesn't I'm not done with it yet.
When I am happy with the block-in, I gradually switch to a more detailed contour, based on Ted's and Tim's methodologies. I think first about movement - looking for large, curving lines of energy and movement throughout out the composition. I watch for movement lines that flow through the entire setup, and look for "events" (folds, shadows, structures) happening along those lines.
Our natural inclination as humans is to simplify and straighten and align, so I constantly fight against those tendencies. Weird shapes are hard to conceptualize and something twisted and tilted inevitably ends up smoothed and straightened when we try to understand it. The key is to make shapes as unusual and specific as they are in life. As Ted says, "draw a portrait of every shape". I like that... a portrait is specific and unique, not generalized or simplified.
The other thing I do is "check the feeling" a lot. I stop drawing and ask myself, how does it feel? If the subject feels warped, crumpled, leaning or twisted, does my drawing feel the same? Feelings say a lot. I want drama and energy in my drawing, and I feel drama and energy when I see the light filtered through a twisted and crumpled piece of translucent paper. My painting will never be successful if I don't capture that feeling.
Next session I'll spend time refining the drawing further, and maybe move on to the first layer of the underpainting. If you are interested in seeing this painting progress, please subscribe to my blog for updates by entering your email address in the right column.
Monday, August 04, 2008
VIDEO DEMO: Wax Paper II
This movie is hosted on YouTube, which greatly degrades the quality. Click here to see a better quality version of the video demo.
Friday, August 01, 2008
Wax Paper II - SOLD
 Wax Paper II (SOLD)
11 x 14 inches
oil on panel
After my last experiment with painting crumpled wax paper, I decided to really challenge myself and crumple up the wax paper and wrap it around a vase - and for a little extra snappiness put in a second crumpled piece of wax paper to kind of hang over the edge of the table and cast a shadow.
Yeah, I thought it was a good idea.... but I had no idea what I was committing myself to!!
Anyway, instead of taking process photos, this time I filmed the painting process. My husband helped me set up his super-duper professional movie camera to take one picture every 10 seconds for 60 hours. But it's going to take me some time to edit it into a nice little movie, so it will be a few more days at least before that's posted.
If you haven't yet, please sign up for my mailing list in the right column so you can be notified when I post the movie!
UPDATE:
> Watch the video demo of how I made this painting
Monday, July 07, 2008
Wax Paper I
 Wax Paper I
11 x 14 inches
oil on panel
I began with a detailed contour drawing the same size as the final painting, and then transferred the drawing to the panel:

It was so much easier to do the underpainting having solved many of the drawing issues already. I used brown and black, and just used paint thinner to lift the paint off again for the lights and whites:

Stage 2 of the underpainting, still using just brown and black and thinner:

A first pass of basic color. I was worried at this point that I wouldn't be able to capture the feel of the wax paper's transparency, but I felt better when I refined the lower right corner of the wax paper shape and started getting a feel for it:

This is where I missed photographing a few stages. I worked especially hard on the ellipse shape of the rim of the dish, it's so easy to make a painted rim look distorted:

Now that the pitcher and dish were complete, I spent the last several days of work just focused on the wax paper, moving from lower right up to the top:
 The completed painting:
NEWS: Two July Shows
I currently have 18 paintings on display right now. Nine are at my eye doctor's office, Dr Marcus, who likes to show a rotating series of art on his waiting room walls. My work will be on display through July and August, and the office is located at:
512 Westline Drive in Alameda, CA
My second show is at Frank Bette Gallery, also in Alameda, and there will be an opening with wine and refreshments this Friday July 11. I'm honored to have had all 9 paintings I submitted accepted to their group show "Still, Life". Frank Bette is located at
1601 Paru Street at Lincoln Ave, Alameda, CA
Oh and an update on the Stow Lake landscape I started last month.... due to the fog and also the smoke from forest fires, there hasn't been a clear sunny day in San Francisco for a month! Even when it is mainly sunny the light has a disturbing filtered feel to it, like we are living in air the color of weak tea. I'd like to paint outside again, but summer in San Francisco may not be the season. We usually have our nicest days in September, oddly enough.
Monday, June 30, 2008
Sneak Preview: "Wax Paper I" and Thoughts on Realism
 Wax Paper I (detail)
oil on panel
(work in progress)
This is just a cropped detail of a larger painting I am working on right now - so far 26 hours and counting. My good camera is broken so I've had to photograph the stages with my inferior "point-n-shoot", but the good camera is being fixed soon so when the painting is done and the camera is fixed (whichever comes later) I'll post the final painting and all the stages.
I decided that posting frequently was making me feel like I had to complete something "postable" every few days. Sometimes a little pressure is good, but sometimes it makes me rush my process. So I'll be posting less frequently, but when I do I'll have something substantial to show, and I'll still publish all the process photos.
In the meantime, here are some thoughts I've had rattling around my head about realist art - or maybe it applies to non-representational/abstract art as well:
When we look at a painting we are confronting a situation of real/not real. Our minds flutter between these two paradoxical concepts embodied simultaneously. This flutter quickens to a thrum, and it is in this space, the simultaneous holding of the paradox, that our beingness is felt.
When we create, we are experiencing beingness – the loss of awareness of self, the loss of awareness of past and future. Nothing but the present moment exists, a true experience of reality. This state is difficult to enter, but in recording it an artist shares the experience. Looking at a painting we get a glimpse of this state of being.
The act of painting elevates the subject. Mundane objects are infused with an epic, monumental quality. Like a scent that fills us with longing for a certain afternoon years ago, a memory, the shadow of reality, can often strike us more deeply than the original. Paintings are the shadow of reality, the record of a memory. Through painting we reveal a depth of reality in the moment that can touch us more deeply than the subject itself.
Thursday, June 12, 2008
Stow Lake, Golden Gate Park
 On the Bank of Stow Lake
9 x 12 inches, oil on canvas board
Session I, work in progress
My paints finally arrived successfully from France!! I don't know what that crazy "pick up your package at the post office in France" message was on La Poste's web site, all I know is the box arrived today!
I was so excited to have my paints and brushes back that I immediately strapped my paint kit onto my to my bike with bungee cords and rode over to Golden Gate Park a few blocks from my house.
In the middle of the GG Park is a circular lake with an island in the middle called Stow Lake, and I knew I'd find something beautiful to paint there. I just loved this spot with the trees hanging over a quiet patch of water.
I decided to spend a whole session on just the values, and save color for another day. It was a good approach for me because just working with dark and light feels simply like drawing with charcoal, which is a lot more comfortable. I'm hoping I can keep the organization of the composition and the feel of the filtered sunlight once I start using color.
Anyway, thanks everyone who wrote sympathy and encouragement for my temporarily lost paints, I was really upset to think they were missing and your emails really cheered me up!
Monday, June 09, 2008
Sketchbook: California Trees
 Buena Vista Park study
I've been home from Paris for 6 days now, and after the week of unpacking, doing laundry, and sorting through 6 weeks of mail, I'm sort of feeling ready to be productive again.
So today I walked up the hill to good ole' Buena Vista park and did this sketch.
I'm trying not to worry too much about my paints, which are in a box somewhere in the bowels of La Poste. I'm trying not to worry that the package tracking number on La Poste's web site gives me a message that says: "Colis en instance à La Poste, destinataire avisé disposant de 15 jours pour aller le retirer." That means, "The package is at the post office, receiver (that's me) has been advised to pick it up within 15 days".
I have no idea what that means. My package is sitting in the Paris post office waiting for me to pick it up? What?? So it's looking like I might need to replace several hundred dollar's worth of good paints and brushes, but I'm holding out hope.
Yes, I have been asked by friends and family and my husband "Why didn't you insure the box?" Good question. Answers are as follows:
a) Being a tourist and a poor speaker of French I'm afraid of French government employees, including post office workers (if you have spent time in France, you are afraid of them too).
b) I don't know how to conjugate the verb "to insure" and I'm not sure they would understand me if I did.
c) I heard a rumor from another American that if your box is worth more than 100 Euros you have to fill out special customs forms and the box has to go through lots of extra vague and scary processes. So I wrote the box was worth 85 Euros.
d) I've tried to ship paint in the USA and they sure don't like it. Now I ship "vegetable oil based artist materials", but I don't know how to say that in French.
So given all that, I took a risk and just shipped the damn box, and they probably x-rayed my package and found out it's not "livres et vestements" like I wrote on the form (books and clothes, misspelled) and on the x-ray machine they saw the squiggly metal tubes and the hinges of my tiny pochade box and thought it was something they would prefer not to ship. That's my guess. But they are French, who knows. Maybe they just thought my adorable pochade box was too lovely to leave their country.
Anyway, in the meantime I am drawing in my little Louvre gift-shop sketchbook with good old pencil (did I mention my good charcoal collection is in the box, too?).
As I drew these branches I started seeing all this crazy fluid spiraling, kind of like muscles twisting around bones, with interlaced forms creating non-parallel tapering wedges .... turns out this organic, energetic human form I've been studying applies to trees, too.
Are we surprised? Non.
Wednesday, May 28, 2008
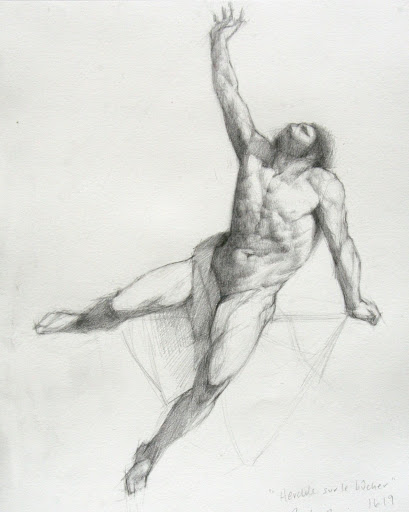
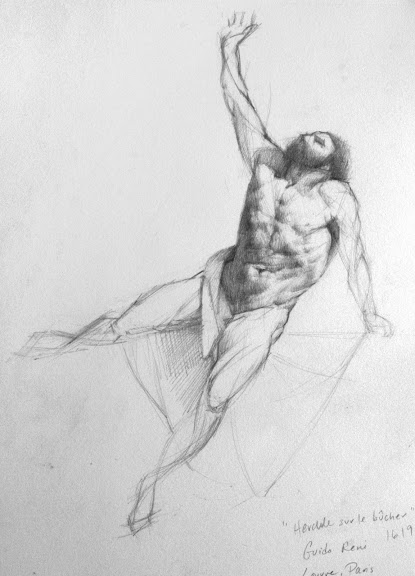
Paris: Louvre Sketch: Reni Hercules II
 Sketchbook:
"Hercules sur le bucher", 1619
Louvre, Paris
Tuesday, May 27, 2008
Paris: Amelie Beaury-Saurel
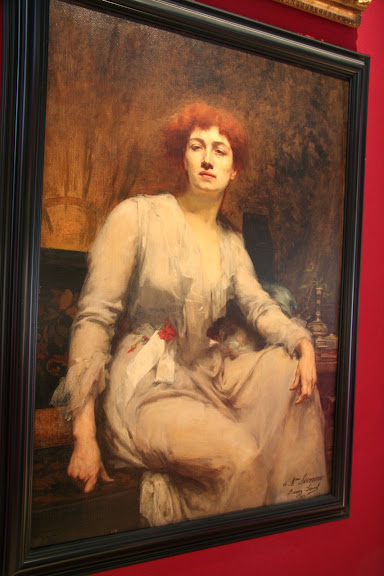 Portrait of Caroline Remy Severine by Amelie Beaury-Saurel
Musee Carnavalet in Paris
I found this gorgeous portrait of a woman writer by a woman painter at the Musee Carnavalet. Turns out the painter AmelieBeaury-Saurel was a famous portrait painter in the late 19th century and ran a woman's art school. She was married to Rodolphe Julien, who established Academie Julien, a French art school women were allowed to attend.
Paris: Musee Carnavalet
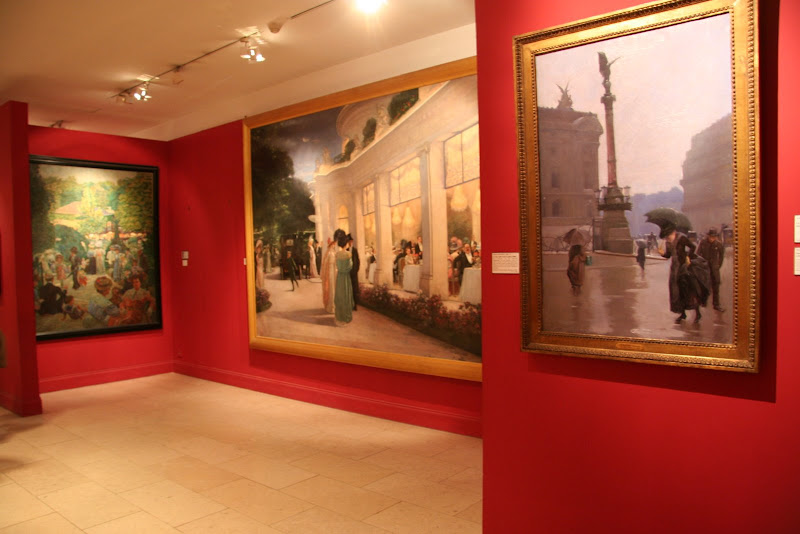
 How is it I have never been to Musee Carnavalet before? It's a museum about the history of Paris, and I guess I was never interested before because I'd heard it was all in French. I just thought it would have a bunch of stuffy exhibits with long explanations in French.
Turns out it's just a gorgeous gem of a museum. Starting with an incredible courtyard garden, it's an experience just to enter the beautiful scene. Even better, there was NO LINE at all, and on this particular day at least it was FREE. It felt like we'd stumbled on a secret museum!
Inside it's chock full of paintings of Paris, paintings in chronological order from throughout the history of painting. It was like a condensed tour of every era of French painting, but at a manageable scale, and all with Paris itself as the main subject.
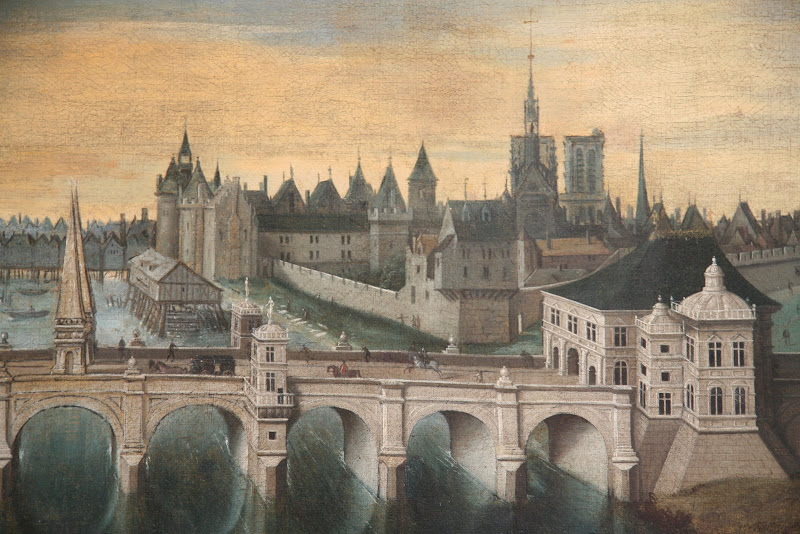
 In addition to the paintings, there are amazing exhibits and models - models of the Guillotine, the Bastille (the armory prison which was torn down during the Revolution and so no longer exists), models of Notre Dame and other churches, and tiny models of medieval Paris herself.
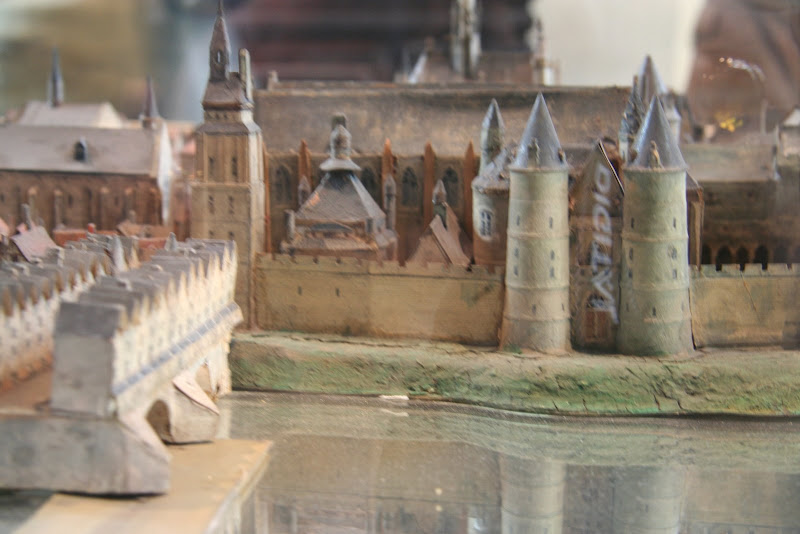 Because it's in two adjoining mansions and not in a huge museum building, we incorrectly assumed it was small. But after two hours we realized we had only seen the 16th century through the 18th century sections! There were still entire WINGS devoted to the Revolution, 19th century painting, and ancient, pre-Roman civilizations. We realized we'll have to come back again to really absorb it all. After three hours we were worn out, and we used our last shred of energy to buy the hardcover catalogue of the museum from the bookstore.
The best part about getting worn out in Paris is.... there's always a cafe nearby to recuperate in!
Paris: l'Oisive Tea
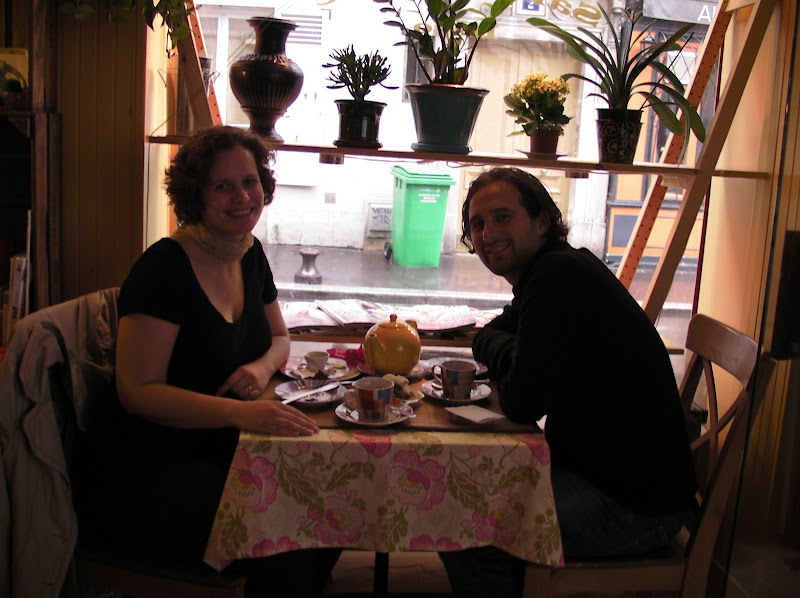
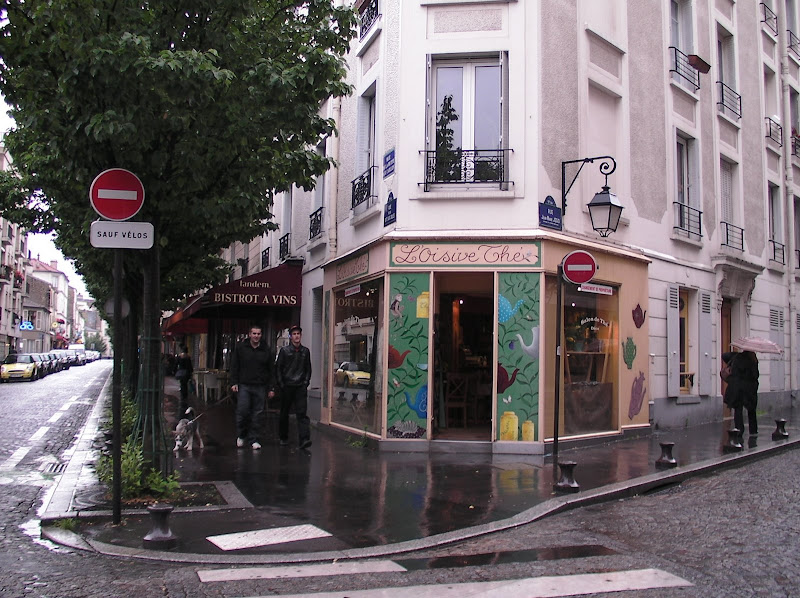 l'Oisive The
Yes, I am on vacation, so no new art. But I can share some recent small Paris treasures we have found!
One of my favorite things to do while traveling is track down little off-the-beaten path places. l'Oisive The is a tea house I read about on a blog a few weeks ago. I had never explored this particular neighborhood called La Butte aux Cailles and I am always looking for new places to love in Paris, so we launched out in the light rain, arm in arm under Nowell's umbrella.
I was thrilled when the tea house was even better than expected - it's quiet and cozy, and the owner is a friendly American woman. I have to say, after 6 weeks in Paris it was really nice to order in English! Nowell and I sampled some of the homemade treats, I had an amazing scone hot out of the oven, and the first one was so good I ordered a second right away. We shared a big pot of Lotus Royal tea, steeped with a large sachet hand-tied around the top of the teapot. The combination of the tea, the gentle rain outside, the soft downtempo music and decor of charming flowered tablecloths put us in a happy mellow mood.

 The neighborhood is a real find too. It looks like a little village with cobblestone streets, bistro restaurants, tiny markets, and dotted with people walking small dogs and parents walking their small children home from school.
Monday, May 19, 2008
Paris: Fois Gras
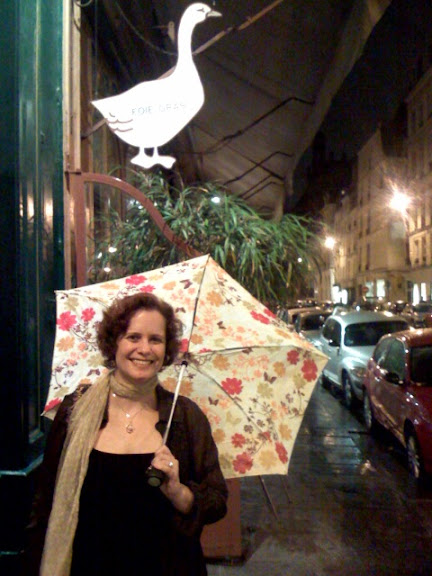 Nowell and I found a restaurant the specializes in fois gras dishes - heaven! This is me under the sign after we ate there (sporting my stylish new Parisian parapluie/umbrella).
More art coming soon..... my plans to paint in the Luxembourg gardens have been delayed by rain, but the sun is scheduled to shine again later this week.
Friday, May 16, 2008
Paris: Louvre sketch: Reni Hercules
 Sketchbook:
After Guido Reni's
"Hercules sur le bucher", 1619
Louvre, Paris
Luckily my husband loves museums too, so he was content to wander alone while I worked on this sketch.
I love this painting, how the ribcage feels like a heavy living mass of bone and connective tissues, sagging and stretching within a flexible network of skin and muscle barely holding everything together. The pelvis and ribcage are resenting their connection by the spine, each urging towards their own expression. The belly is only an afterthought, no intention of its own, merely subject to other forces. The limbs are all secondary, the gesture is complete in the torso.
Thursday, May 15, 2008
Paris: Louvre Sketch after Pajou
 Sketchbook:
After Augustin Pajou's "Pluto Chaining Cerberus", 1760
I brought Nowell to the 18th century French sculpture wing of the Louvre today. It was fun to watch his jaw drop as we rounded the corner into the Puget Courtyard, full of the examples of the pinnacle of figurative sculpture. He was content to roam around filming for a while I worked on this sketch.
Wednesday, May 14, 2008
Paris: Musee Rodin
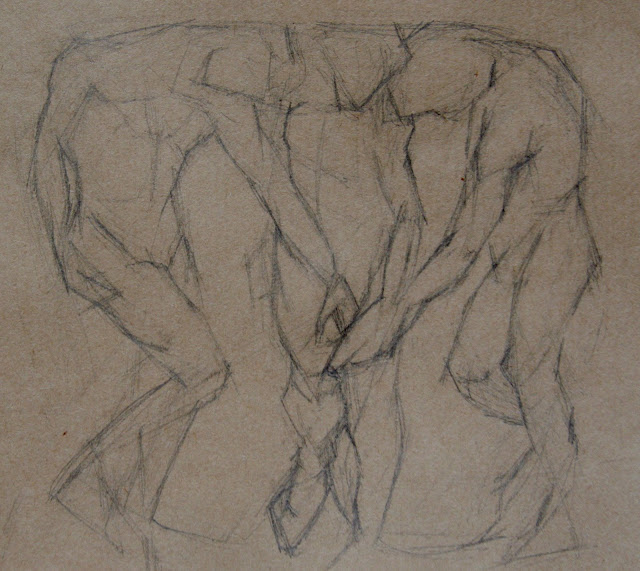 Sketchbook
After Rodin's "The Three Shades"
Nowell and I spent the afternoon at the Rodin Museum in Paris. It currently has an excellent exhibit on Camille Claudelle, Rodin's mistress who was an accomplished a sculptor as Rodin. This life-size figure group is outdoors in the gorgeous garden of the museum.
Nowell recreated a picture we took six months ago at Philadelphia's Rodin Museum:

Tuesday, May 13, 2008
Paris: Medici Fountain
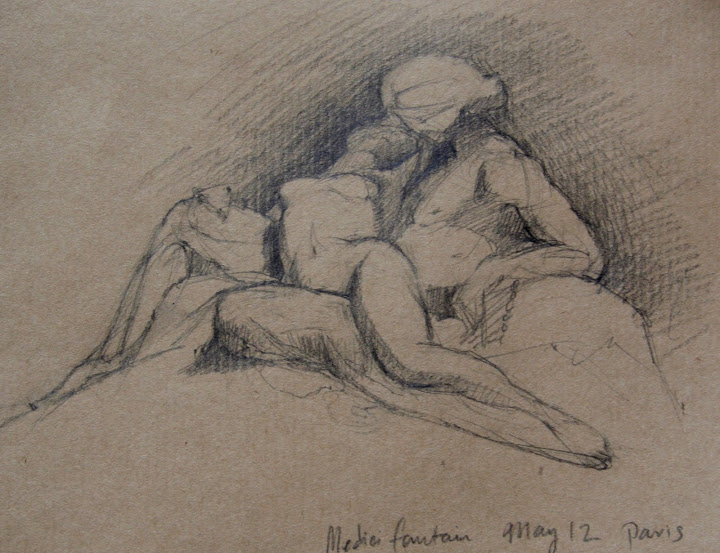 Sketchbook:
Medici Fountain, Luxembourg Gardens, Paris
Every time I come to Paris I visit Marie de Medici's Fountain, tucked away in a corner of the Luxembourg Gardens. The first time I drew this fountain was exactly 20 years ago, when I was 16 and in Paris for the first time. Maybe I can track down that old sketchbook and post my first drawing of the sculpture.
Friday, May 09, 2008
Paris Blog Love
In San Francisco I am very healthy - I exercise a lot and eat low-carb/high protein/high fiber every day, I go to bed early and get up after a full 9 hours of sleep, never drink caffeine, and I haven't been sick in a long long time. But here in Paris, I stay up late, consume croissants and chocolate and coffee as much as possible, and drink wine at LUNCH of all unhealthy habits (well, I admit I drink a lot of wine in the US, too, but rarely at LUNCH). After all that abuse, I guess I deserve to get sick. Let's hope my little rheum/cold doesn't get worse, because my husband arrives Sunday and I want to greet him at the airport looking spiffy!
Anyway, I've spent my sick-ey afternoon online, catching up on all my favorite Paris blogs and bookmarking all the places they mention that I plan to visit once I am healthy again. So I thought I'd share some of my favorite bloggers.
First off though, I have discovered something extraordinary about Google Maps. As if I didn't already have much to love about Google, they went and made their maps customizable. Yes, you can put your own pushpins on the map with your own notes, you can plan routes and share your saved maps with friends. What riches!!!
On my own Paris 2008 Google map I've marked everything from the bank ATM's that don't charge me a fee to restaurants and all the little gems of Paris I plan to visit. I can even plot a walking route and find out it is 3,216 feet from the exit of the Louvre to Le Souffle restaurant, where Dad and Andrew and I dined the other day.
How to Make Your own Google Map
Go to maps.google.com and click the little orange tab under the Google logo (I bet you've never even noticed it) which says... "My Maps". Oh la la!! From there you can save locations and mark routes and edit them to your heart's delight. (Yes, my friends and family think I am a bit obsessive about planning vacation details as I have been known to make elaborate travel maps in Adobe Illustrator... but if Google has gone to the trouble of offering this functionality, I can't be alone in my obsession, can I?) Anyway, moving on....
My Plus Favorite Paris Blogs
Polly Vous Francaise is written by a charming American expat who shares so many of my tastes I am sure she and I would be fine friends if we met.
I Prefer Paris is written by a fabulous American expat in the Marias who shares many hidden secrets of Paris and even offers guided tours.
Paris Breakfast is one I discovered back when I was doing A Painting a Day and have loved following along with her little watercolors of her various marvelous petit dejeuners in Paris ever since. What's not to like about a blogger who loves Paris and breakfast and painting as much as I do?
King Nigrito is a cute mystery man, 23 cm tall and made of leather and resembling a mouse (maybe?). He gets around and has photos of himself at his favorite spots. Very useful for me, as he happens to haunt my adopted arrondissement/neighborhood and the day after one of his posts you can reliably find a very quiet 30-something American woman in hat or scarf or both, trying not to look or sound too American, testing out King Nigritos' very seat and surreptitiously making notes in her Moleskine Paris Guide.
(You don't know what a Moleskine City Guide is? Get one now!!!)
Ok, enough blogging for today. I'm going to make some tea and watch Paris channel 135, which according to my Dad's husband Andrew has old American classic movies subtitled in French. Magnifique!!
Studio Escalier Workshop: Final Drawings
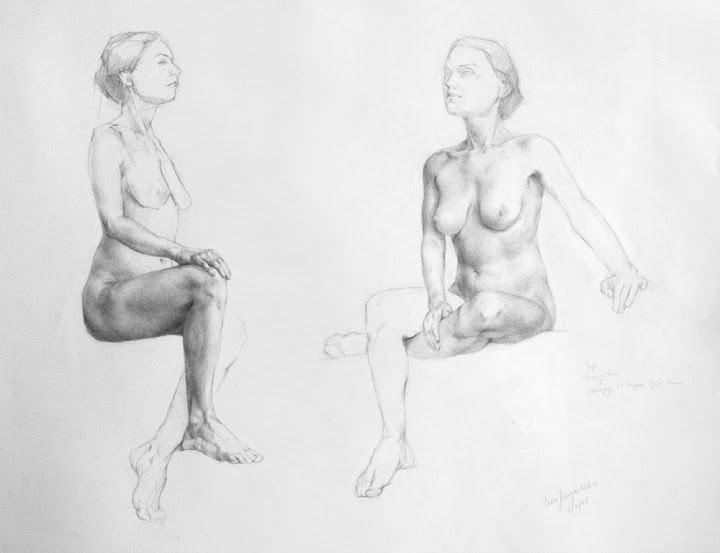 Sarah Twice
18 x 24, graphite pencil on paper
9 hours each drawing
For our final week at Studio Escalier's Drawing Workshop in Paris we worked on two long poses to practice all the contour and modeling lessons we have been learning from Tim and Michelle - one pose in the mornings and one pose in the afternoons. I decided to put both my final drawings on the same sheet of paper - just a bit of extra challenge for fun.
Here's a slideshow of the stages of the drawings
I had critiques with both Tim and Michelle. Their comments were really helpful and give me a lot to work on for my future drawings:
I need to think about "packing the form" - the human body is made of irregularly shaped packed forms arranged on curves. I need to remember to define the top edges of those forms, the edges facing the light, as much as the bottom edges, the edges facing away from the light.
Also, in both these drawings I've over-modeled in the light. All the darkest shadow is on the side of the model turned way from me, so almost everything I saw was in the light. In my zeal for modeling form I made everything too dark.
I also need to practice seeing the forms arranged in fans arcing off of changes of direction on the contour.
Finally, I need to emphasize structure and solidity, otherwise my approach with soft gradation tends to look too wispy. I agree. I am not interested in making pretty drawings, I want to make strong drawings.
Not only have I learned a lot about drawing from this workshop, but also my expectations for myself have been raised in the process. I have a vision for how well I will someday be able to draw, a vision for how I could draw with a lot of practice and investigation, and it's far more developed than I ever expected of myself before.
Friday, May 02, 2008
Louvre Sketch - Hutin Sculpture
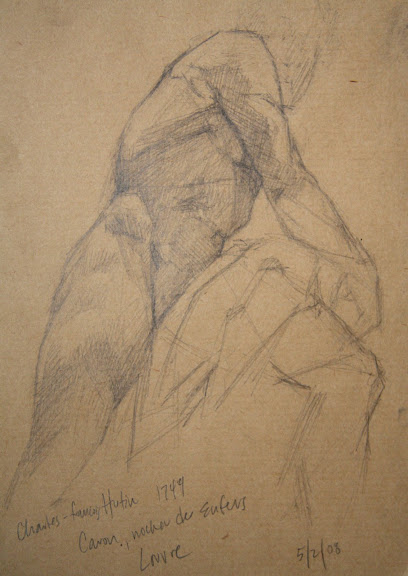 Sketch after Charles-Francois HUTIN
This my sketch of a small, 30-inch sculpture done by Hutin in 1744 as his final exit project to graduate from the Royal French Academy.
Wednesday, April 30, 2008
Studio Escalier Workshop Day 8
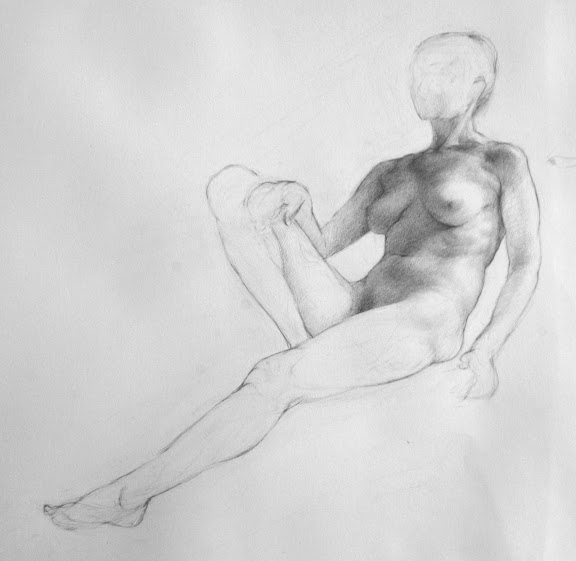 tonal study, pencil on paper, 6 hours
 (detail of above)
Day 8 of my workshop at Studio Escalier in Paris.
This is a drawing of a 6-hour pose. Yesterday for the first half I focused on the inner movement curves, the block-in, and finally the detailed contour. Tim and Michelle are teaching us to think of the contour three-dimensionally. So I am thinking of the contour wrapping around the body, moving towards and away from me.
I've taken my drawing into Adobe Illustrator and used the software to recreated my original inner movement curves to diagram the process I am learning:
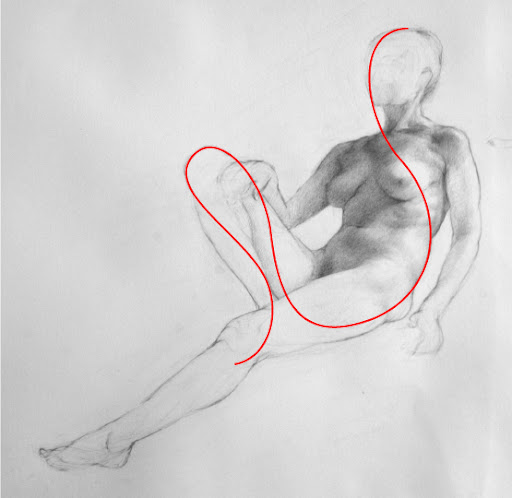 As Tim teaches the technique, we draw three interrelated movements:
We start with the theme, which is the fundamental inner movement curve. The theme starts at the crown of the head, and flows down the center line of the face, down to the big toe of the standing leg, or the leg holding the most weight.
This is a precise curve, it describes specific points on the body and the relationships between these points. (In contrast to simply "expressing" the movement. This is a record of what we see and know about the body, it's not exaggeration or expressionism.)
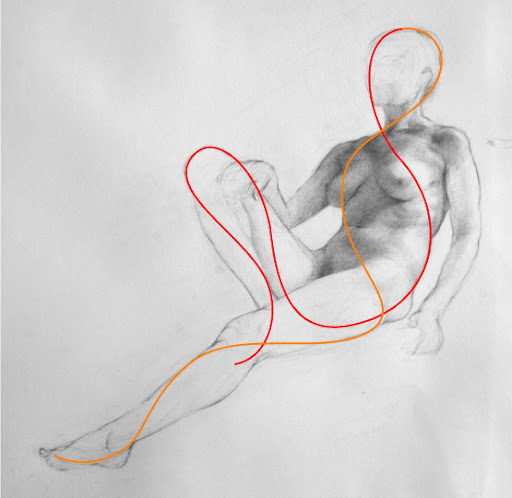 The second line we draw (above) is the countertheme - the orange line. It's a secondary inner movement curve that travels from the top of the head, wrapping around the body the opposite direction and down the non-standing leg.
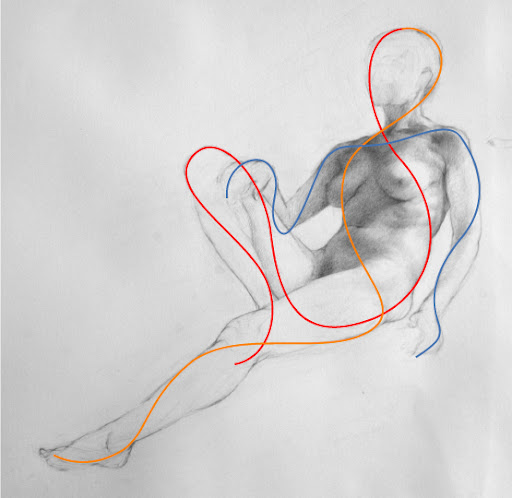
Third, we draw the ornament (above). This is the third interrelated movement. As with the theme and countertheme, the ornament wraps around the forms, moving side to side and back to front.
 All of the curves wrap around the body three dimensionally. Above is the same countertheme curve, but I've created dotted segments to show where I am imagining it wrapping around the back side of the form. (I do not modify the figure to fit these curves, it's amazing the interrelations it's possible to see once you start looking this way.)
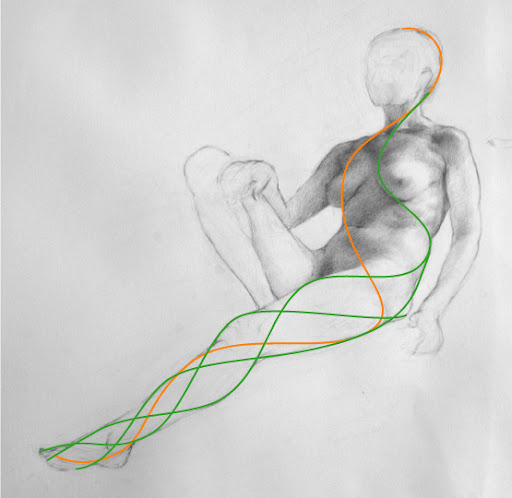 Above I've shown how adding more and more interrelated movement curves begins to describe the form. As I get more and more detailed with my contour line, I can see how every form on the body follows this wrapping helix pattern.
It's interesting to recreate the curves in Adobe Illustrator. The program creates Bezier curves that have a certain mathematical tensile force, and you have to learn to manipulate them to create flowing curves without awkward bends. The behavior of of Bezier curves is amazingly conducive to the Inner Movement Curves - it was shockingly easy to recreate the curves with the software. I have a feeling there is an implicit relationship between the cohesive, efficient, and functional forms of the body and mathematical curves.
Update added 5/03/08
Bezier was a 20th century French draftsman! Wikipedia has a great entry on Bezier curves, and near the bottom of the page you can see elegant animations for how Bezier curves are calculated.
After spending so much time on the contour, I moved on to the tonal value shading. I was surprised how quickly the value study progressed. I think learning the contour with this method gives me a deep understanding of the three dimensional figure, so flowing the light across the form is easier.
I'll end with a quote from Tim:
I agree.
Wednesday, April 23, 2008
Studio Escalier - Drawing Movement
 Afternoon Pose, pencil on paper
I'm practicing drawings based on the "inner movement curve" method in my class at Studio Escalier, and today I really felt something click.
This drawing feels more solid, more believable than my previous drawings. I feel like I am suddenly seeing the relationships between all the parts as a whole, and feeling the three dimensionality of the pose. It has everything to do with what I studied with Ted Seth Jacobs, but Tim Stotz's emphasis on movement is making Ted's teachings come together for me. (Tim was a student of Ted's, so no wonder).
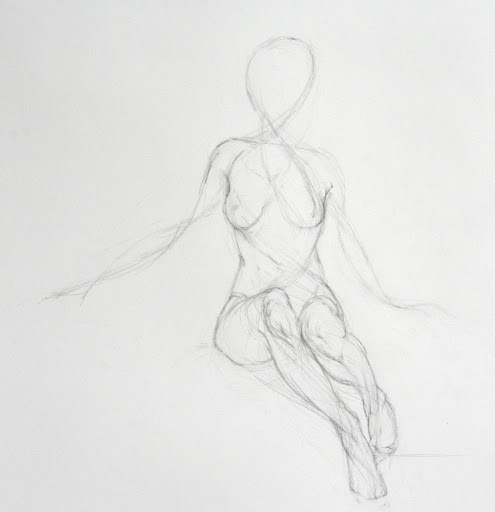
The drawing above started with this drawing of the interior lines of movement:
 Afternoon Pose, Phase I
The first gesture lines aren't much to look at. In fact they look somewhat random and loosey-goosey. But it's actually quite precise. They correspond to very specific points I see on the body - and more importantly, the relationship between those points.
Next I started fleshing out the drawing, starting with the legs and drawing more and more inner movement curves to create the full line drawing. The outside curve of the knee has everything to do with the interior angle of the ankle. Everything wraps around and appears again in a logical place.
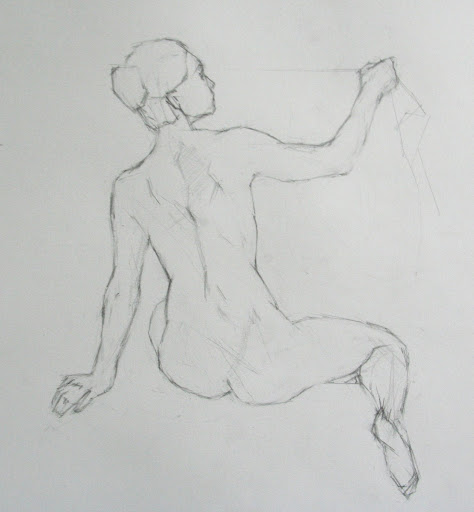
 Afternoon Pose, Phase IIAfternoon Pose, Phase III, final
In contrast, this is the drawing I did in the morning, when I was really struggling with the concept. I think you can see it does not have the same energy as the afternoon drawing.
 Morning Pose
Studio Escalier has arranged several evenings for us to draw at the Louvre from the sculpture gallery. Tonight was the first night, and it was incredibly exciting to see all the sculptures so powerfully describing the same concepts we have been studying.
This is my drawing of a 30-inch marble sculpture by Dumont, done in 1712. It was in a room full of similar small-scale sculptures, which Tim explained were the final thesis projects which students of the 18th century French sculpture academy had to submit in order to graduate and go on to be professional sculptors. These small works represent the pinnacle of the art of figurative sculpture.
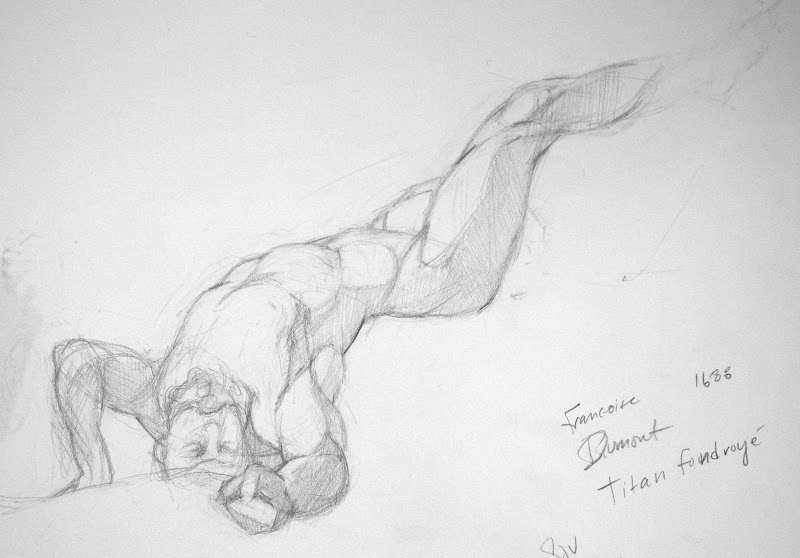 The figure has a clenched fist thrust directly at me... I don't know why I choose such a difficult view. But it made me interested to do more hand studies.
By the way, the Louvre website is amazing. I just found out you can browse the entire collection, room by room. I found the room we were drawing in today here.